|
|
Post by voodoochikin04 on Aug 27, 2020 17:58:17 GMT -5
I'm jealous of your C model people who can unbolt the oven face from the front of the stove.. Mine is behind a folded lip. Looks like the whole oven box would need to come out, then the cast frame.
I did get the door frame off, AND the springs for the door, BUT cant get the rods and hinges out, scared to pull too hard.
|
|
|
|
Post by dwayner2 on Aug 27, 2020 22:53:54 GMT -5
I’m a little confused on the oven door issues but that’s not uncommon, Ha! Did you get the springs off the pantry door or the oven door?
To remove the rods and springs on the oven door you first pull out the little pin holding the door hinge to the oven door. I call them a speed bolt because they have no threads, just a cut on the end to flare out to keep the bolt from slipping out. Once those are off, you pull everything out the back of the stove. Around the back, you’ll see the end of the threaded rod with the two nuts near the end. That rod is sitting inside a small rectangular opening, that rectangular housing actually can be pulled out from the back with a flat screwdriver and pliers. This will then bring all the parts to the spring out thru the back.
|
|
|
|
Post by voodoochikin04 on Aug 27, 2020 23:20:31 GMT -5
I have the oven door cast iron bit off the stove. I have the springs and nuts off the rods. But I was trying to pull the threaded rod out. Youre saying I need to pull the whole rectangle tube out of the back? That wont allow insulation to fall down and block me from putting it back together eh?
|
|
|
|
Post by dwayner2 on Aug 28, 2020 8:29:13 GMT -5
Good point. It should be OK, that rockwool has been packed pretty tight and doesn’t shift much. What you could do is pull them out, restore them and then insert them back in a few days later. In the meantime, don’t do much on the stove body itself so you don’t shake the wool into the holes.
Make a note on which one is left -vs- right and before you pull them out. Also, attach a 3’ wire or good string on the front end of each hinge before you pull them out. That way you can use the string to guide your rods back thru the insulation as you put them back in.
|
|
|
|
Post by voodoochikin04 on Aug 28, 2020 13:23:34 GMT -5
Valuable information right there. Obvious stuff that just doesn't even come to my mind haha. Thanks!
|
|
|
|
Post by voodoochikin04 on Aug 28, 2020 20:45:11 GMT -5
Ok more work done.. couple steps backwards because im a moron. Started the day by wire wheeling some parts(using my wire wheel station), the gas lines, springs, disassembled the thumblatch box and found what I expected. 3 of the latches had strips worn out where the valve wheels ride. I decided to go ahead and weld those up. BUT.... I was not thinking and just flipped the welder on and buzzed the first tab..... UGH... voltage was way too high. Pictures tell more that I can type.
Got these parts all cleaned up today. The broiler arms look good in the photos but they had quite a bit of rust. Should I paint them? Have them chromed or nickel plated?
Then with these oven racks. Should I separate from the enameled panels and paint/plate them? Or just clean em up and run em.
|
|
|
|
Post by dwayner2 on Aug 29, 2020 0:42:30 GMT -5
First of all, melting a hole in the thumbtab holder....been there, done that! 😠
Those broiler lift arms look pretty nice to me, most of mine are worse off than those.
-buff off with wire wheel and/or sand them down using a VERY WORN lap sanding disc (120 grit) mounted onto a 4” hand grinder. I say WORN because a new disc will cut into the metal too fast and leave lots of flat marks. And always keep the grinder/lap sander moving up and down the rods...don’t stop in one spot too long. You want an even slick surface when done.
-now soak in Phos Acid 4-6 hours to kill the remaining rust. Let drain and dry for 2-3 days. Brush off the dry acid using a wire wheel on a bench grinder.
-pop them into an oven at 300° for 30 mins to bake out all remaining moisture....or heat with a torch.
-let cool enough to where you can hold them with a potholder and then apply a very thin coat of food grade mineral oil. Bake at 325° until they stop smoking. Now repeat the oil and baking 2 more times. Done! Main thing to remember is to bake the rods to remove any moisture BEFORE the first coat of oil. Doing them this way makes them look great but you will likely need to re-apply more oil as the rods begin showing signs of rust. Spring and Fall is a good time for that. You can oil them, turn on the broiler flame and open the windows to let the smoke out. 😬.
With all that said, you CAN have the rods rechromed or maybe ceramic coated if you want to go the extra mile on it. I asked Salt Lake Chrome what they would charge for one lifter rod a few years back, $20 a piece is what Kevin told me. I’m guessing they run $25-$30 now.
It’s late now so I’ll cover the side runners tomorrow.
|
|
|
|
Post by dwayner2 on Aug 29, 2020 7:45:47 GMT -5
Oven Side Runners.....
-remove the enamel baffles
-you can repeat the process as described for the broiler arms above but instead of coating them with mineral oil, I heat them to remove the moisture and then spray on the gray VHT 2000° paint from the auto parts store. Then a coat of Rustoleum Silver High Heat spray paint to make them shine. Bake on the paint as instructed on the VHT can. They will stay nice a long time as long as you’ve killed the rust and heat them before painting. NOTE...anything you paint with VHT paint cannot be sprayed with oven cleaner later because it will remove the paint and get all over the oven. You will need to remove them each time you clean. That’s true for any and all painted parts on the stove.
-many people prefer to re-chrome for looks and it DOES make the racks slide better. Just remember that if there is ANY pitting in the metal when it’s chromed those areas will be magnified and very noticeable. You can use the lap sander to make the rods nice and smooth but the flat ends, not so much. Estimated cost might be $50 per side.
-you could also check into having them ceramic coated, though I’ve never done it. My Cousin had his muffler done that way because it holds up to the heat and you can get it done in a gray/silver color with a slightly flat finish (no gloss with ceramic paint). Nice thing there is that the semi-flat finish will help hide those pitted areas.
|
|
|
|
Post by Chuckie on Aug 29, 2020 8:32:33 GMT -5
Ok more work done.. couple steps backwards because im a moron. Then with these oven racks. Should I separate from the enameled panels and paint/plate them? Or just clean em up and run em.
I'm chiming in TOO LATE for your restoration, but I DO wanna add something for future restorations. When you wire-wheel the gas supply lines to clean the crud off, DO NOT wire wheel the FERULES--they will NOT seal properly after that!!!   I did about TWO of the Imperial lines ferules on the wire wheel, and they would NOT seal. Dwayner was NOT charmed w/me as he had to cut two new lines to replace them. Oh well, live and learn, perhaps someone will read THIS, and NOT make MY stupid mistake again!!  CHEERS! Chuckie |
|
|
|
Post by voodoochikin04 on Aug 29, 2020 9:12:49 GMT -5
Atleast for my own sake, I've already read your warning prior to cleaning mine. So I did not touch the ferrules.
I wired the brass and then steel wooled the tubes for a semi polish.
|
|
|
|
Post by voodoochikin04 on Aug 29, 2020 14:45:04 GMT -5
Oven Side Runners..... -you could also check into having them ceramic coated, though I’ve never done it. My Cousin had his muffler done that way because it holds up to the heat and you can get it done in a gray/silver color with a slightly flat finish (no gloss with ceramic paint). Nice thing there is that the semi-flat finish will help hide those pitted areas. The headers on my Corvette are ceramic coated. Holds up well to the heat! |
|
|
|
Post by Chuckie on Aug 29, 2020 19:09:08 GMT -5
Atleast for my own sake, I've already read your warning prior to cleaning mine. So I did not touch the ferrules. I wired the brass and then steel wooled the tubes for a semi polish. !!! I'd FORGOTTEN I'd already POSTED the warning!! And you CAN do the nuts/tubes on a bench wheel fitted with a (soft) BRASS wire wheel w/no problemo!! CHEERS! Chuckie |
|
|
|
Post by voodoochikin04 on Aug 29, 2020 20:54:45 GMT -5
I'm looking at this stove body.... what a daunting task it'll be to wire wheel all of it. Is the rustoleum 2000 degree high heat paint going to be the same as the VHT? It appears to have the same baking cure instructions. (I did pick up a can of the high heat primer, and the high heat silver).
Is there a good way to reduce the valve wheels wearing into the thumblatch tabs? just keep em greased?
|
|
|
|
Post by dwayner2 on Aug 29, 2020 22:03:12 GMT -5
I think all the high heat paints are similar as long as they take the 2000 temps. VHT makes other types that don’t take as much heat so be sure to check the labels.
Stove body...I degrease the nasty areas with Easy Off, then wipe that off with a damp rag and let dry. Then I get a lap sander and go to town on the body, 60 or 80 grit. If you have corners with rust that the sander can’t get to you might try sandblasting those spots. I also sandblast any areas that are deeply pitted by rust. Then I do the Phos Acid, let dry a couple days, lightly sand, and then paint. Other people can chime in on what they use. I brush on real alum paint and then spray paint with Rustoleum gloss black or semi-gloss.
NOTE.... if you get water in the corners and under the folded metals, heat with a torch right away to remove the moisture. I also heat the stove body in sections before I brush on the alum paint. Just like the other instructions before, ALWAYS remove the moisture from the metal before painting or seasoning.
|
|
|
|
Post by voodoochikin04 on Aug 29, 2020 23:21:28 GMT -5
thanks! got it!
|
|
|
|
Post by pooka on Aug 30, 2020 1:52:52 GMT -5
Is there a good way to reduce the valve wheels wearing into the thumblatch tabs? just keep em greased?
The problem here is improper use. You should never turn the valve lever unless you have the thumb latch depressed, You have to in order to turn it on. But once it on, if you turn the lever alone, it drags, causing that wear. It's a design that could use some improvement. With any consumer product, you can't make people use it correctly. Mostly, no one knows any better. It takes years of careless us to saw through the thumb latch piece. If the wheel part just had a wider profile like a tire, it would improve it vastly. It being just thin sheet metal, it make it a perfect low tech saw. The design was good enough. It was probably a known issue, but it wasn't worth improving the design. I guess greasing it helps, but getting in the habit of always depressing the thumb latch before you turn the lever should eliminate the wear. |
|
|
|
Post by dwayner2 on Aug 30, 2020 8:37:44 GMT -5
Pooka said exactly what I was going to. Only way to prevent that groove from forming is to always depress the thumb tab while adjusting the flame on the burners.
|
|
|
|
Post by voodoochikin04 on Aug 30, 2020 22:18:05 GMT -5
Decided to snap a shot of our kitchen sink and cupboards that were installed in 1953 when the house was built. I grew up here, and in the 20 years from when I left until I came back to this house, the cabinets have been painted several times, and the color scheme is not our own. We plan to redo it beginning next year. Anyways I think the chambers will match nicely with my existing setup.
|
|
|
|
Post by mach12 on Aug 31, 2020 1:05:02 GMT -5
Love that drainboard sink!! We tried to find one when we redid our kitchen but every time I found a decent one someone bought it out from under us. Just wasn't meant to be. We ended up buying a farmhouse style sink from Ikea and it's pretty nice but I still have my eyes open for one like yours. Here's a picture of the one we put in. It's just an in-process picture so is before the tile, trim, floors, or even our Chambers were in - But we had a working kitchen sink again!  |
|
|
|
Post by pooka on Aug 31, 2020 1:39:59 GMT -5
I have a similar single sink & drainboard with corresponding cabinet in my basement kitchen. I think it was installed in the early 60s. The house was built in 1939. The original bank of cabinets are still in the upstairs kitchen, although the countertop & sink are from 70s. Grandma was so vigorous at scrubbing the downstairs sink, she's worn through the white porcelain, exposing the cobalt blue undercoat. Redoing the porcelain isn't in the budget. No bare metal showing, so it's got a rustic well worn charm. But what do I know. I'm just an eccentric old hermit.
After my grandfather died in 1960, & a few years later when my uncle got married, he & his wife moved in here. They set up a kitchen & sitting room area for grandma in the basement. That way my uncle & his wife had their kitchen & living room upstairs, & grandma had hers downstairs. Grandma had a long legged stove from the 20s downstairs. When she died, my cousin took the stove away, so that left me with a kitchen without a stove.
It didn't really bother me, because I had the one upstairs. Being a bachelor, I never cooked much anyway. I always had a lookout for a stove for the basement, but never in earnest. In one of my periodic search of ads, I saw my model 74 about an hour away in a little town just off the Interstate. I was hooked almost immediately, even though I had no clue what I was looking at. It was obvious it was something well above the mark than any run of the mill stove. In looking, no one else knew what it was either, which was even more intriguing. Well I got the stove & became one of it's most fanatical devotees. I've searched all things Chambers every since. I've chronicled all models I could all the way back to 1912.
Ones like mine & the similar model 7440 are still rather rare birds. I've only seen a handful in the years since. There are hundreds of models over time. The model A,B & BZ were made in bigger number, & the C was made in huge numbers compared to anything before. |
|
|
|
Post by voodoochikin04 on Aug 31, 2020 8:12:07 GMT -5
mach12 we periodically see the single sinks show up for sale locally but have yet to see another double. How do you like the wood counter tops? I thought about doing that as well. We have such little counter top space I thought about doing some really nice stone since it wont cost much. I'm not entirely sold on our metal cabinets, they have many layers of paint and some of the drawer slides (which are spot welded in place) have began to crack, and I don't see any way to get in there to fix them. I do like your sprayer faucet but my wife doesn't so we settled on my next favorite. pooka Thats an excellent story! There are several chips on our sink but its not underlined with the cobalt blue, but rather a black almost clay looking material. I'm guessing its that base I read about as to why places wont do new porcelain on old tubs and sinks. --------------------------------- I can't say for certain ive seen any models for sale outsite of the A,B,BZ & C. The more I see the C's models, the more I kind of like the backsplash on them.
|
|
|
|
Post by nana on Aug 31, 2020 9:10:55 GMT -5
Voodoochikin04, I love the red and white tile backsplash! It makes me think of a checkered tablecloth—so cheerful and friendly! I hope that isn’t one of the things you are going to re-do. Although if it is, after all it’s your house and you have to please yourselves. But I would keep that for sure. Red or cream countertops too match, a little red trim on cream colored cabinets, it could be really sweet.
|
|
|
|
Post by voodoochikin04 on Aug 31, 2020 11:10:43 GMT -5
So the tiles are actually really badly painted we had planned to strip them and or remove them.
I'm torn though. I don't mind the coloring, the walls are maroon like the tiles but my wife hates it and I have to agree it makes the small kitchen feel smaller being so dark. But personally it feels more charming and goes nicely with white. Our countertops have stainless rounded nose at the front and stainless 5" tall or so backsplash.. with a disgusting sticky speckled countertop material. It's like the pre-prototype to epoxy garage floors lol. I really thought about doing a black locust butcher block counter top.
Maybe we will strip the tiles and redo them nicely.
|
|
|
|
Post by voodoochikin04 on Aug 31, 2020 12:47:16 GMT -5
UPS delivered the goods!! Also got some valve grease via Dwayner! Thanks!  |
|
|
|
Post by mach12 on Aug 31, 2020 12:57:52 GMT -5
We went back and forth on which stove to get until my wife saw a picture of a red B or BZ and that was it. I have a blue 90C that I was going to install but that's now going to go live with family in Iowa. It was originally in Queens, NY, then the owners were transferred to Portland, OR and took the stove with them. I bought it in an estate sale and moved it here to Olympia, WA, and now it's headed to Iowa. I'm wondering whether it should have wheels instead of the legs currently on it. We like the countertops. I was originally going to put Formica and ordered a style we liked but they shipped the wrong ones and then when they got it right they were damaged. I saw an ad for these at Lumber Liquidators so being a cheap sucker, I went and looked. The guy was walking all over two of the slabs and said they had some bad areas so I got out my tape and the spots that were bad could be cut out so after some negotiation we loaded them up. I did the thing where you wet the surface to raise the grain, let it dry and sand them, and repeat. Probably 6 or 8 times. I looked at several finishes but ended up doing a rub with a mix of beeswax and mineral oil (basically cutting board conditioner). First couple of rubs using 0000 steel wool, let it soak in, then buff, and the rest just rub in with a piece of cloth and buff with an old towel. We did it more frequently at first but now do a coat just when we think it needs it. Maybe 4 month near the sink. It's kin of a hassle but we find that clearing the counters to do it is a good time to do stuff I put off too often, like cleaning the toaster. Our kitchen originally had Formica backsplashes but we wanted tile and eventually decided on subway tile. I'd never done any tile work so studied the heck out of it and it looked to me that it was like painting a car where the real work was all prep work so I made sure the walls were properly prepped, primed and painted them, Let it dry for a couple of weeks, and then deglossed it and put up the tile. The kicker was when my wife said we needed to put a strip in it to break up the amount of white, so I got to do glass tile as part of my first tiling project too. It turned out great and I wouldn't hesitate to do it again. The only picture I have that shows the tile very well is this one that I took the night I finally got the stove put in. 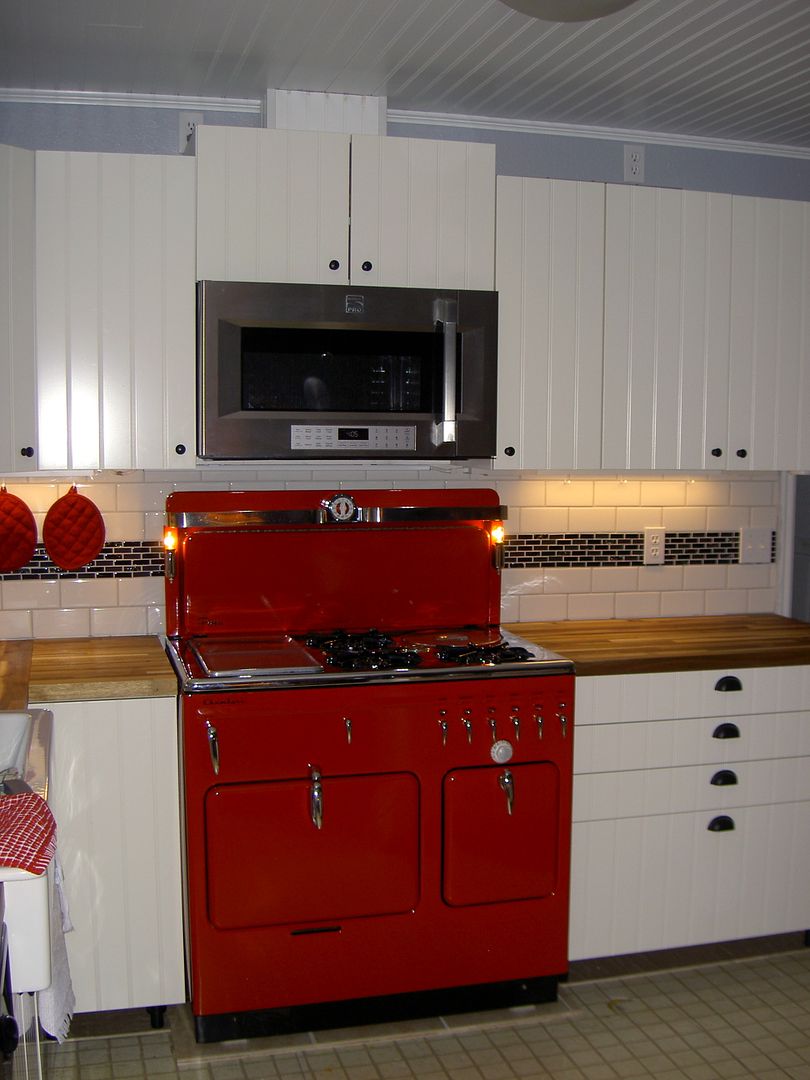 |
|
|
|
Post by voodoochikin04 on Aug 31, 2020 13:20:56 GMT -5
First time ive seen beadboard cabinet doors too, looks cool. I like that tile work alot. Ceramic tiles under the cabinets & stove?
|
|
|
|
Post by mach12 on Aug 31, 2020 14:53:03 GMT -5
I put ceramic tile under the stove and the fridge and under the cabinets is a layer of underlayment covered with a heavy duty commercial flooring. I wanted to raise the flooring under the cabinets so it would be even with the wood flooring and since it's a floating floor I didn't want the weight of the cabinets or stove on it. I removed the vinyl that's in the photo, so the flooring came out pretty even. You just leave an expansion gap and then fill it with caulk in case of a spill. We went with hickory because of its varied coloring and because it's high on the janka hardness scale.
We went with Ikea cabinets and I really like them. These were made in the U.S. at the Danville, VA plant and the quality is great but I read that they shut down the plant and consolidated with a plant in Europe, so no idea how the quality is now. Probably fine though. We lived in Germany for 5 years and I bought a lot of Ikea stuff there and it was fine. I worked for a finish carpenter for a couple of years and hung a lot of cabinets and the Ikea system beats anything I ever saw. You hang a steel rail and the cabinets hang on the rail. The legs on the lower cabinets are almost unneeded but the heavier stuff tends to go in those so it's a good idea.
|
|
|
|
Post by voodoochikin04 on Aug 31, 2020 16:20:39 GMT -5
I've never purchased anything Ikea. I watched some nice videos about their "private" forests. Anyways. A French cleat system would work too.
|
|
|
|
Post by vaporvac on Aug 31, 2020 18:26:51 GMT -5
You could also replace the countertop with formica keeping the SS front and backsplash. The would be very much in keeping with the age of the stove.
|
|
|
|
Post by voodoochikin04 on Aug 31, 2020 19:44:03 GMT -5
We did plan on keeping the SS nose and backsplash on the counter and putting them on whatever new material we chose. I think it looks neat!
|
|


