|
|
Post by Rebekah on Jul 19, 2014 11:07:46 GMT -5
Greetings, all. I've endeavoured to document my 'renovating' experience as thoroughly as possible. I'm an adamant DIY-er - often muddling through in the absence of information, rather than patiently asking for help (what can I say? I'm a stubborn Taurus! My husband says I'm worse than a man for not wanting to ask for directions/instructions). If you're interested, the full saga (with more to be added) is located at hilda.hhandg.com/?p=1033. There are loads more photos there. Documentation which was in the range can be located at chamberscommune.proboards.com/thread/2422/model-instructions-documentation.) I DO have some questions about burner adjusting at the end of this post if you want to skip ahead.
Here's the short of the story though:Despite being located in a basement which had standing water (!!), she (no, she doesn't have a name ... but she's a she) was in very good condition. The only porcelain chipping was on either side of the cover (the lip at the very back), and on the cooktop, only the very front has lost its shine (possibly worn down by rubbing over the years?). There was quite a lot of rust, but thankfully, it was superficial. A wire brush and an application or two of naval jelly took care of that. I followed up with Rustoleum's High Heat matte black spray. (4 1/2 cans, to be precise ... and yes, I did weigh them to verify that I'd used 6oz of the 5th can!). I stripped her completely down EXCEPT for removing the oven box and fully disconnecting the thermostat. Why? I didn't feel that I needed to go quite that far. (I tied the lines for the thermostat out of the way while spraying.) I contemplated getting the top reporcelained to 'fix' the dull front edge and the slight dulling to the area above the burner pilot, but that would mean losing the rather charming iridescence. Pretty, don't you think?
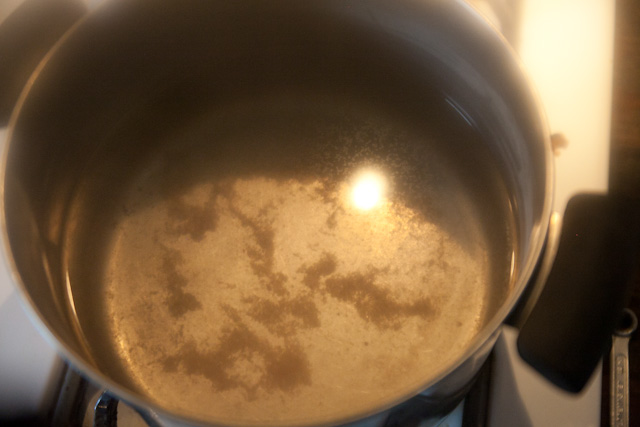
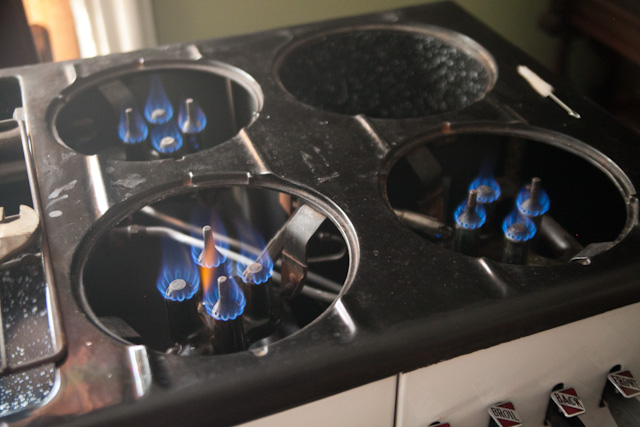
To explain the background in the photos ... I did all of the work in the Entry Parlor of our 1870s Italianate. The floor is pretty trashed (pending $$ to lay a new floor), so mess didn't matter ... and I had easy access to the porch for spraying. (We don't have a garage) Added bonus is that it's directly above the furnace room, so dearest hubby ran a gas line for me to test her and verify that I do want her as my primary in the kitchen. What a guy. (Our kitchen was built entirely from scratch on our design. All fitted cabinets (from scratch, not modular) with countertop to fit our standard-sized Maytag. We (hubby) are going to have to hack away chunks of countertop on either side and to the back. Anyway ... back to the Chambers. We fired her up this past week, and everything lit fine overall. I noticed yellow at the top of the flames though, and some of the 'petals' on the daisy burners weren't lighting. I'd already rinsed the burners through (lots of rust came out), but as an extra measure, I put the burners through the self-clean cycle of my oven. The petals were better on two of the three after the heat cycle, but the third one is pretty abysmal now! Only half of two stems (wrong word, but I'm going with the daisy theme - I'm sure you get the gist) light, unless I close the air adjuster fully - then I get full flames - but they're yellow ceiling-lickers (ok ... not quite ceiling). Photos saying it all, here they are.  broiler (high) 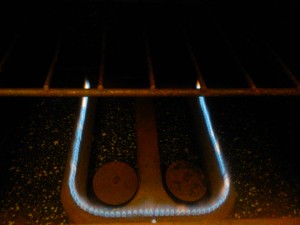 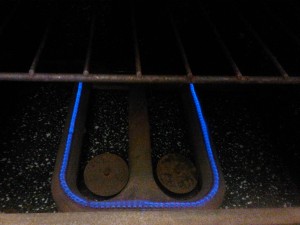 oven (high) / oven (low) sorry for the different colour temperatures - point is that there's yellow tips in the pic on the left 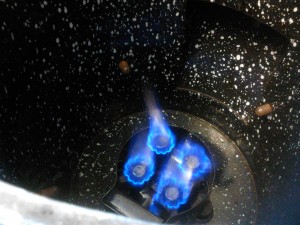 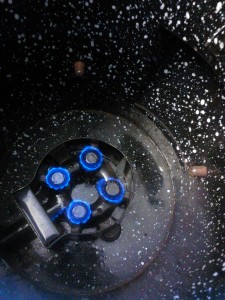 Thermowell (high) / Thermowell (low) 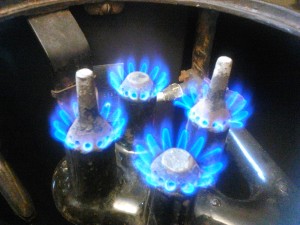 front right (full) 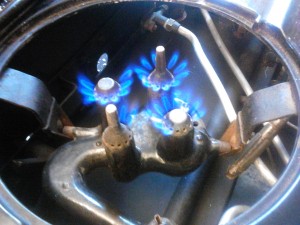  front left (full; before blowing) / front left (full; after blowing) not sure why I have to blow it to get the flame to distribute?? 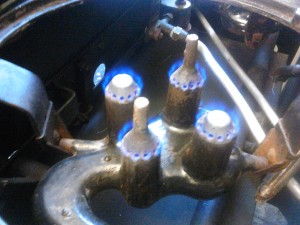 front left (low) Now, onto my most problematic one. The back. 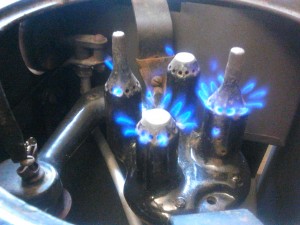 This is full gas; intake fully open. 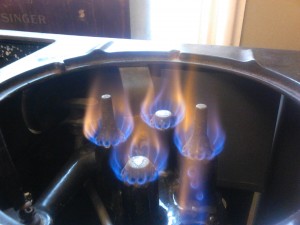 This is full gas; intake fully closed. 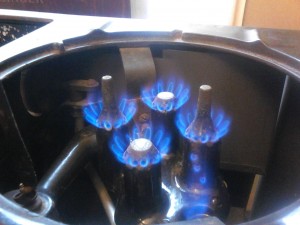 This is full gas; intake part-closed. Note that the hole for the pilot connection is also burning. Otherwise, it'd be a nice cone. 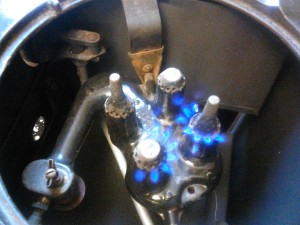 This is full gas; intake fully open again. Only with the intake fully open did the flame over the pilot hole go out. It probably should be noted that when I shake this burner, it rattles. Whatever it is won't come out though. So my dear experts ... what thinkest thou? Thanks in advance, and hope you enjoyed the pics  Rebekah. (EDIT: If you want to fast-forward to my follow-up post with pictures, rather than reading the backs and forths contained in the following posts, click > here<) |
|
|
|
Post by Rebekah on Jul 19, 2014 11:31:48 GMT -5
One other question ... What's the difference with the burner grates? I have three different ones, and expect they all have slightly different functions (heat distribution/focus?) |
|
|
|
Post by chipperhiker on Jul 19, 2014 11:59:47 GMT -5
Way to go Rebekah! Thanks for posting all these great photos of your adventure. Your stove looks great, and I'm with you - that iridescence is cool. You are my new hero.
I'm sure you've already tried it, but have you boiled out the rattling burner with washing soda yet? Cleaned out the individual gas holes with a pipe cleaner, toothpick, or needle? What you are hearing rattle around may only be the tip of the iceberg of what's inside that one burner.
Here are the instructions I found posted by Chuckie about the washing soda boil:
"Boil 1/2c washing soda mixed in a stock pot of water with burners for one hour at least. You can boil for a shorter time, but leave them in the solution for at least an hour. Rinse WELL...I used a hose to flush out all the interior crud. Dry in 350 oven (large toaster oven is good or grill) until TOTALLY dry. Maybe two hours. You can lower the temp to 250 after an hour, just be sure they're perfectly dry inside. (Don't waste the heat. Cook something in there...this isn't giving off any fumes, just drying."
I'll let the early stove experts here comment on the specifics of the burners, but I'd say that you should adjust yours, including the oven burner on high, to get rid of the yellow/orange flames. It's a sign of incomplete combustion, and, having just gone through my own little carbon monoxide alarm after my thermowell burner got suffocated by steam, it's something best avoided. It was a very clear reminder to me about the colorless, flavorless, scentless danger that is carbon monoxide. Yikes.
|
|
|
|
Post by Rebekah on Jul 19, 2014 12:48:31 GMT -5
Thanks for reminding me about the CO.
I read about your experience, and subsequently put a 2nd CO monitor on the other side of the parlor (approx 20ft away at eye-level)!
I did wonder if perhaps too much gas was coming into the range compared to what would have been typical 'in the day'.
If I turn down the gas, the yellow also reduces.
When I tested the pilots, turning the valve completely resulted in an ENORMOUS flame - I had to close it to probably less than 1/4 of the way open for it to be the recommended height.
I had seen mention of boiling the burners, but huge thanks for pasting it here. Guess I'll give that a go next.
On goes the adventure!!
Rebekah.
|
|
|
|
Post by pooka on Jul 19, 2014 14:19:00 GMT -5
Kudos for you on a job well done. I admire your can do attitude. I'm especially pleased to see an older model like yours. There weren't as many of them produced, so to me they are particularly precious. Both my stoves are slightly older than yours, but are closer to yours than the model Bs & CS in the way they work & use many of the same parts. I believe my model 74 uses the same pilot light as yours, although my model 7141 uses a different one. Mine also share the same controls, valves & thermostat. Your stove Is the improved version of my very similar & earlier model 7141. Great pictures too by the way. I rarely see the bottom of a stove. Your pics show me many details that I've never seen before. There's something about the old porcelain, especially on the tops that has a warmth that the new somehow doesn't. I don't know what it is. Ive never really noticed that iridescence on my cook-tops, but I may have not been as observant as you. My model 74 had a bit of a white haze to it until I started cooking things like bacon. The grease splatter has lubed the top from being wiped up, so I don't clean it too vigorously. I've thought of getting a buffer & try buffing it out with some sort of rubbing compound or glass polish, but I can live with it the way it is. She's seventy nine years old & in original condition & still cooking. I feel lucky to have her. Your burners look a bit on the high side but close. The flame tip shouldn't look like it's leaping off of the burner quite so much. Yellow flame is a no no. It's OK to have the occasional yellow flare, but only that. To me it looks like a bit too much gas on most of yours. I don't know if you have the adjustable mixing pins or orifices or fixed ones. Here's some pics of the burners on my model 74. I believe they are adjusted about right. 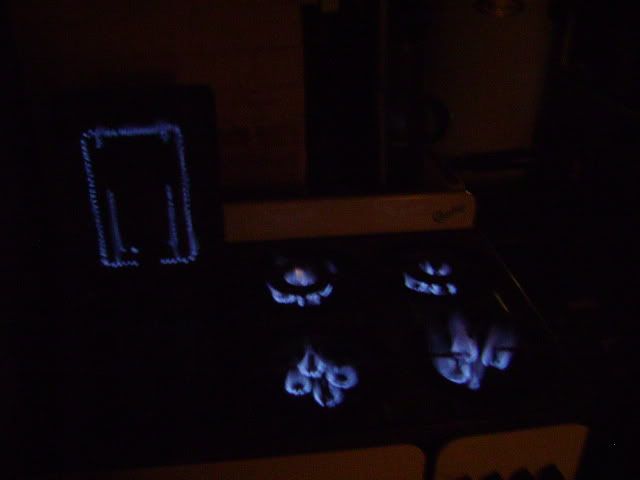 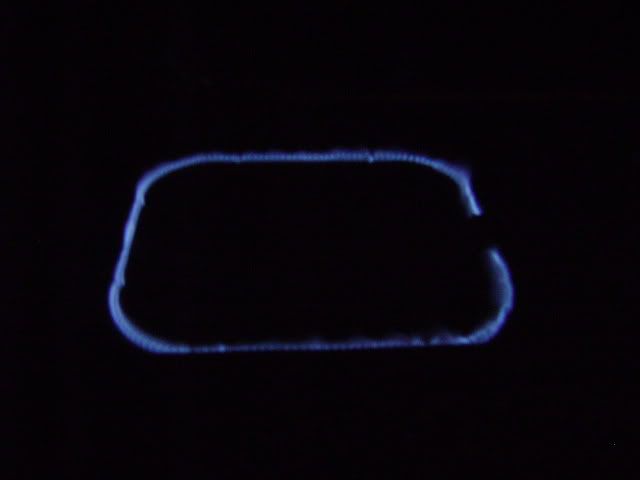  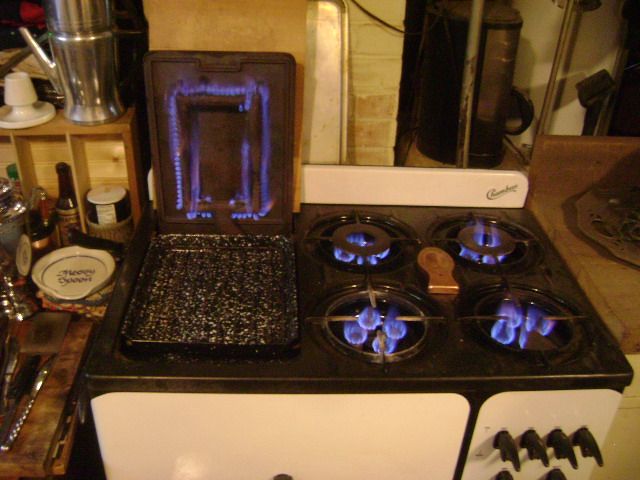 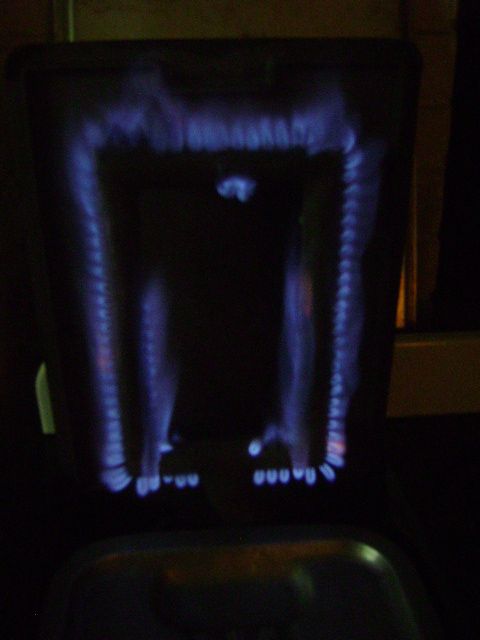 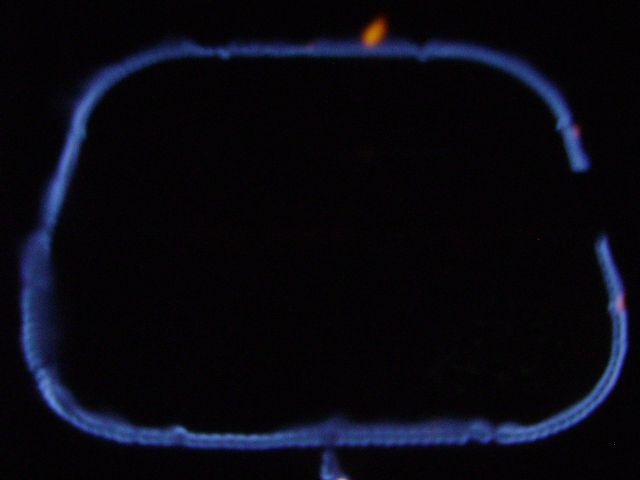 This last one is me testing the burners from my model 7141 on my model 74. 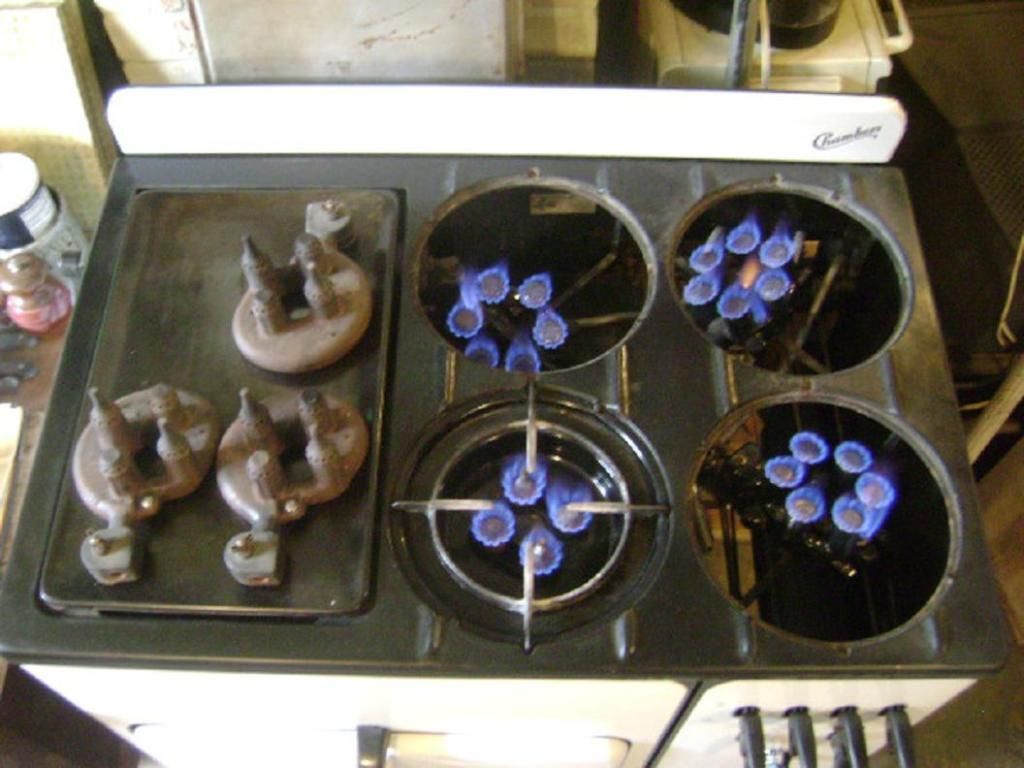 The one difference between you burners & mine are that the oven burner I believe should be a bit taller than my older style burner. I'd have to check the manual. Here's a link. Model B/BZ Service ManualAlso I think you can look up the hole size on those burners that aren't lighting fully. Then get the proper size drill bit to drill them out. The last thing is your grates. The one with only four tines is the high speed burner. The one with the triangle is the coffee burner. The triangle is meant to deflect heat to keep the coffee pot handle cooler. The one with the doughnut disc is the simmer burner. |
|
|
|
Post by Chuckie on Jul 19, 2014 14:22:53 GMT -5
One other question ... What's the difference with the burner grates? I have three different ones, and expect they all have slightly different functions (heat distribution/focus?) In your photo, the one in the back is a tea kettle grate--you would put the handle of your tea kettle over that little "v" and ALLEGEDLY it wouldn't get hot ( NOT true!). The left front one is open, and that was considered the "high heat" grate. The one w/the circle in the middle is a "simmer" grate. On our stove, I have the tea kettle/simmer ones switched opposite of where you have yours... Oh and BTW, WELCOME to Chambers-land!! CHEERS! Chuckie |
|
|
|
Post by marka on Jul 19, 2014 16:17:58 GMT -5
Nice work!
After you boil out your burners, which is worth doing, if they don't light with the pilot you might try switching them around.
I don't know why but they seem to like certain spots.
|
|
|
|
Post by vaporvac on Jul 19, 2014 18:43:50 GMT -5
Definitely boil out the burners. Chuckie's instructions (which sound suspiciously like my own post ) are correct. The big rattle sound isn't as bad as the fine silt that can block the holes. Also be sure to clean out the main gas/pilot lines. I also have the kettle grate in the front so the boiling water isn't directed toward the timer. Chuckie, my triangle works great keeping the handles cool. I just used my "new" Vaculator this morning and was pleased yet again and the handle on my Wearever is also good. I wonder why the difference. OK1 I just visited your site. Very cute...loved the snoods! You should get with chipperhiker about downloading those documents to the main site, (if she can help with that) don't know if that's related to helping here, but there's not as much info directly for the As a nd a few others have been struggling with theirs recently. I love your stove. I have a B which also had to come out of a basement! You have to tell us about the Shur-lite autolighting when you have a chance. I've never seen one before. Welcome. p.s. Your kitchen is pretty ,too. |
|
|
|
Post by Chuckie on Jul 19, 2014 19:51:01 GMT -5
Definitely boil out the burners. Chuckie's instructions (which sound suspiciously like my own post ) are correct. LOL, I was thinking the EXACT SAME THING--I don't "recall" posting that, BUT I have like NINE-BAZILLION posts, so perhaps I DID @ one point!! KUDOS go to vaporvac on the burner boiling, not I--although NEITHER ONE OF US "invented" the technique!! CHEERS! Chuckie |
|
|
|
Post by Rebekah on Jul 19, 2014 20:15:34 GMT -5
Burner boil-out completed. Unfortunately, I used the old(er) pressure canner which I'd be using yesterday (don't generally keep very large pots upstairs, and that literally JUST came up from the basement). It's cast aluminum. Did a full rolling boil for 20 minutes, after which I turned it off, but left the burners in the solution while we went shopping. We were gone 3hrs or so. Now, the surface of the inside of my canner feels very rough, and portions of the sides look like maybe a layer has been removed. Bummer. I now realise that washing soda reacts rather viciously with aluminum. Does anyone know if I ought to render it useless for pressure canning?? Such a shame. It was a lovely older one. The water wasn't particularly dirty afterwards, though there were lots of soda crystals on the burners. Gave them a good rinse and a scrub, and presently have them in the oven. That'll probably be all for tonight. Any special recommendations for cleaning the lines? Air? Water? Definitely not washing soda lol. Thanks to everyone for the recommendations. Oh - and vaporvac, that poor blog is sooooo out of date! I became a stay at home mom to our 3yr old last spring ... started homeschooling ... now she's 4 (and working through gr 1 materials, may I proudly add ) AND I've got a 6 month old on my lap!! I haven't even turned the drafts from my first months as a non-working lady into actual posts!! 'Nuff said, methinks! I had come to the conclusion that there wasn't much out there on the A models. I actually have the installation / basic panel removal etc guide ... but that's missing a chunk of text from the broiler-resident-mouse which needed more bedding. I've scanned it in though. chipperhiker I'd be delighted to share better resolution scans of my documentation. In fact, part of the reason for joining this forum was the seeming absence of contact information for the site owner/operator. I wanted to share. At some point, I want to make a basic nuts/bolts location drawing to help others. More to follow. |
|
|
|
Post by lwagne on Jul 19, 2014 22:09:34 GMT -5
I think if you go after those holes with a small wire "bottle brush" you'll see a difference. My repair guy said they came as a set. But - I can't remember what for. Maybe at an auto supply store to clean spark plugs??? Someone else can fill in the blanks. you're doing a great job and you will be thrilled, I promise. One other thought. If you have a gas line run up from the basement, just maybe the pressure is turned down too low to get the flame to go all the way around. Just a thought. I think yours is just like my Bella  |
|
|
|
Post by Rebekah on Jul 19, 2014 23:35:19 GMT -5
Well, the boil-out seems to have made matters worse.
I have a cleaner for my trumpet valves (like a bottle cleaner, but much smaller) which fits the holes on top, so I cleaned out any residue in the tops
For now, I'm going to have to assume that perhaps there are washing soda crystals still on the inside of the burners.
Hot water and vinegar??
Boil in vinegar?
Oh ... any my poor burners look rather awful too from being in the solution for so long.
There's no shine at all (ate through the porcelain?), and everything has a dusty grey tint.
I guess I can use a shiny black high temp spray if it comes down to that.
Might want to edit the instructions to say "at least an hour ... but no more than ______".
I'll have to try to video tomorrow so you experts can see what's happening.
The flames are very poorly distributed.
The one burner that was halfway decent is less so ... and the one that was fine wouldn't light first time when I just tested it.
The problem burner is now lighting out of even less holes than it did before.
I turned on the pilot to see if the gas from that might change anything.
All I saw, however, was that it looked as if gas was building up in the burner chamber, down the pilot tube, and then igniting pilot-side as a small puff that that jumped back up the tube and out of the pilot hole on the burner.
It was somewhere between one puff ever 1-2 seconds.
Burner adjusters were open fully on all burners.
It's too late for me to try to make sense of anything else, but I figured I'd post the latest update just in case some of you in other time zones had some clever ideas for me to try in the morning.
Thanks all.
|
|
|
|
Post by cinnabar on Jul 20, 2014 9:49:45 GMT -5
About the pressure canner, if the edges that need to seal are not damaged I would try and use it. The rest of the pan could be buffed out and/or scoured down for a smoother finish. You need only use water for pressure canning so there would be no harm in setting it up to see if it maintains pressure safely. Give it a whirl. Yup, washing soda and aluminum don't mix.
The dull finish on the burners is sometimes the result of the cleaning the old gunk off. The previous owners used who knows what to clean them and that along with age and use can cause the whitish-dulls. Oiling them may bring back the shine. I have also used the high temp paint on my burners and it is not a bad choice.
Getting them re-porcelained is expensive. I had my grates done they have done nothing but chip and flake ever since. The older cast iron seems to be a challenge for the new porcelain. So save a few bucks and try the oil, and or paints first. (IMHO)
I would try re-washing the burners to get any residue out, at this point it won't hurt. Don't use the washing soda, just soapy water, rinse well. If you can blow out the burners with compressed air, it can hasten the cleaning and drying as well as knocking out loose particles.
cinnabar
|
|
|
|
Post by Rebekah on Jul 20, 2014 10:07:27 GMT -5
Thanks, cinnabar. I'll try the air compressor tonight. I did find the offending rattle yesterday - it was a nail-like piece of metal (albeit headless) that presumably had been used to clean out some holes ... and ended up dropped inside! I did a bit of reading on what would react with washing soda, and found sodium hydroxide. I'm a hot-process soapmaker, so I had the NaOH crystals on-hand. I put the burners through another boil in a mild NaOH solution, and there was a good film on the surface, along with a precipitate on the bottom (photos will follow eventually). Actually, I'd already decided to try a cast-iron-seasoning-type-process with the burners while baking the moisture out, so that's happening at the moment. I'm glad to know that I'm thinking along the right lines. As to the pressure canner, I guess my concern is that a weak spot (even tiny) in the cast aluminum could pave the way for an explosion! Perhaps I'm just being way overcautious. Maybe I'll test it outside on a pot-belly. Then again - there's the concern about it potentially exploding when I go to take it off of the heat. Thanks again. |
|
|
|
Post by mach12 on Jul 20, 2014 10:31:04 GMT -5
Has anyone used white vinegar on the burners? I restore other items like old cast iron cookware and use white vinegar (acetic acid) to remove rust all the time and it's awesome (and both inexpensive and environmentally friendly). I did an old shotgun last fall that had sat on my wife's grandparents back porch in Nebraska since the 1920's and was pretty much a pile of thick rust - way beyond patina. I took off the wood parts and put the metal parts in vinegar for a couple of hours, rinsed it while doing a bit of a scrub with 0000 steel wool and a brass toothbrush type brush, mixed some baking soda in water and soaked the parts to neutralize the vinegar, and then rinsed it in hot water and dried it in the oven at about 200F. Other than a few pits on the outside of the barrel it's spotless. I have no experience using it with porcelain enamel though and haven't gotten around to trying it. In the box of parts that came with my Chambers A are a couple of spare burners that the enamel is pretty much history on and I've intended to try it (even have a 1 gallon bottle of white vinegar and box of baking soda sitting there). Just not enough hours in a day. If anyone has used it on the burners it would be interesting to know how it worked out.
|
|
|
|
Post by pooka on Jul 20, 2014 12:29:50 GMT -5
I can't speak about the washing of the burners. I didn't have to do anything like that on mine. Once you get them all cleaned up, painting is probably the most economical way to finish them off. I think the last time I heard the price of having the porcelain redone was $25 or $35 each verses a couple of cans of paint. I've heard others say that the new porcelain flaked off somewhat around the tips where it gets hot. Your idea of seasoning them is worth a try because it's so easily done. If you don't like it, you can simply clean them & try something else.
If you notice on the last pic I posted above, three of my burners are sitting on the griddle. They were never porcelain coated. They came from the factory painted black. The only part of the paint that's left is on the tailpiece. The rest has developed a rusty patina. Again I've pretty much left them alone. These burner are made so heavily, I don't think it's possible to wear them out. It would take many lifetimes in the worst of conditions for them to rust out. One of the good things about these "A" style stoves, is that the drip-rings cover all but the tips of the burners, so you see less of the body of the burner than on the "B" & "C".
One small note of info on these "A" style burners. You notice the long pin that protruded from two of the burner's four petals. They are there to insure that a pan can't get too close to the burner & smother it. Thus assuring correct space for air for proper combustion. In the manual, the instructions for switching from natural gas to propane, after you install the shallower bracket & drip ring, you're suppose to saw a bit of these pins off to allow the difference between the two.
|
|
|
|
Post by Rebekah on Jul 20, 2014 13:13:02 GMT -5
Thanks, pooka. I pulled the nipples off of the gas supply to the burner to check for any blockages ... and then wondered why, as the problem seemed to move with the burner vs. being a line issue. Nevertheless, it gave me the opportunity to take some more photos, and to put the correct gas goop over the thread. I played around with the height and colour of the flame that I'd get with various settings, variables being: 1) the actual lever on the front of the stove 2) the nipple (too tight, and it chokes the gas supply - so in theory a person should be able to control the gas flow to some extent this way) 3) the air intake It was interesting, actually, and I actually managed to get a nice cone on one of the 'bad' burners. I plan on making a short video to show the different flames with the different variables. Now - another question - the pilot line from the back of the thermostat broke just past the compression fitting. There's enough line to reach, but I need a new compression fitting. Where can I get another? Home Depot and Ace don't have anything that small. Someone else suggested that perhaps an auto parts store might carry that size (used on brake lines?). Anyone have any experience with this? What about the post screws? (the one on my griddle lift snapped at the head as I was taking it off) Thank you |
|
|
|
Post by chipperhiker on Jul 20, 2014 13:14:55 GMT -5
Burner boil-out completed. chipperhiker I'd be delighted to share better resolution scans of my documentation. In fact, part of the reason for joining this forum was the seeming absence of contact information for the site owner/operator. I wanted to share. At some point, I want to make a basic nuts/bolts location drawing to help others. More to follow. Rebekah, I think that your restoration story would be an excellent addition to the VIntageChambers site. That site is overseen by tux_sf. Maybe you could send him a PM and see if there is a specific format or photo resolution that he needs. |
|
|
|
Post by pooka on Jul 20, 2014 15:32:47 GMT -5
I've got a 1920s era "Directions for use and Adjustment of Chambers Fireless Gas Range" & a catalog from the teens "Chambers Fireless Gas Ranges Catalog 7" as well as three ads from 1912. I've scanned them myself & have posted them before. They are all posted on my Photobucket page. Here's a link the the first two. Directions for use and Adjustment of Chambers Fireless Gas RangeChambers Fireless Gas Ranges Catalog 7I converted one to a PDF & the rest can be also. I just never goat around to doing it. I'd be happy if they were posted in a more central place where people could have an easier time looking them up. I still get a kick looking at the last page of this catalog that shows their cheapest stove & this monster 20 gallon cooker. It looks like a giant Thermowell. You'd have to have a crane to lift the pot out of this thing.  |
|
|
|
Post by mach12 on Jul 20, 2014 20:44:05 GMT -5
That 20 gallon cooker reminds me of the giant steam kettles in the galley of the Navy destroyers I was stationed on. That 20 gallons would be enough for a ships crew too!
|
|
|
|
Post by Rebekah on Jul 20, 2014 22:09:13 GMT -5
I apologise that this is a slowly progressing video.
I literally did a grab-'n-go with the camera, so I talk about what's going on in real-time.
The video goes through the adjustments via the top-side screw to raise/lower the air cover, and also that of tightening/loosening the gas nozzle/nipple which goes into the burner.
Hopefully it will be informative (if not painful for those of you who might wish that I just get on with it, already!!!!).
In the end, I went burner by burner, line by line - adjusted each burner and each nipple ... and ended up with just about a uniform blue cone across all three burners.
Yay!
|
|
|
|
Post by chipperhiker on Jul 20, 2014 23:28:46 GMT -5
That's awesome! Thank you for making and posting your video, Rebekah. It is a great addition to the Chambers knowledge base.
Before you posted it, I never would have guessed that the air intake being off kilter would prevent some ports on the burners from lighting, but your video illustrated the problem nicely. When I adjusted my 90C's burners, I didn't see anything like that (the flames just got more or less orange, but the individual ports all stayed lit). It's interesting how the different models behave.
|
|
|
|
Post by lwagne on Jul 21, 2014 6:46:16 GMT -5
That is a GREAT piece of work. Usually we all just tinker, tinker, tinker along and finally get a nice flame. I love how this video shows how and why. Also, I think I just have one nut on my air intake, so I was just loosing or tightening without any real control with a wobbly disk on the bottom being more or less closed - that's going to change real soon. This information will help all of us a lot!
|
|
|
|
Post by Chuckie on Jul 21, 2014 13:03:35 GMT -5
That's awesome! Thank you for making and posting your video, Rebekah. It is a great addition to the Chambers knowledge base. : Now that you're an Administrator, you need to "pin" this post up @ the top of the restoration section so folks can easily find it in the future after 10 million more people post to there! CHEERS! Chuckie |
|
|
|
Post by Chuckie on Jul 21, 2014 13:06:58 GMT -5
I apologise that this is a slowly progressing video. I literally did a grab-'n-go with the camera, so I talk about what's going on in real-time. video, bekahmancino!! You just walked folks through what most us MUDDLED through as lwagne indicated!! Hope Chipper "pins" this so it stays towards the TOP of restoration thread. Thanks again for doing this! CHEERS! Chuckie |
|
|
|
Post by pooka on Jul 21, 2014 14:29:23 GMT -5
After viewing your video, it looks like your overall pressure from your main gas line seems like it's a bit too high. I don't know if you're using natural gas or propane. You seem like your getting the mix about right for a nice blue flame, but this higher pressure is making the flame tip just a touch too high. You're right about the pilot flash tube being in place or not affecting the rest of the burner. When it's not in place, the bigger hole changes the pressure for the whole burner. I have the same three piece flash tubes & pilot as yours on my model 74. They are very finicky to get to work properly. Sometimes they work & sometimes they don't. I took the back two off & dropped an appropriate sized screw into the pilot hole in the burner to block gas flow & the bigger flame jetting out of it & match light those when I use them.
The occasional orange flares your getting could easily be tiny bits of dust & debris that have been stirred up in your gas lines being blown though. That should settle out once you get everything adjusted & in it's final resting place. These old stove can be a bit fiddly to get dialed in. There is plenty of head scratching & hair pulling to go around that we've all experienced. Some of us have a an easier time than other. But if you like to cook, once you get it up & running & get clued in to the Cooking With The Gas Turned Off, you'll never want any other kind of stove.
We can all tell stories about cooking one thing or another. I love being able to start a roast in the oven, & after burning the gas for twenty or twenty five minutes, shut it off & walk away for two, three or four hours & coming back to a perfectly cooked roast & the oven temperature is still 190 degrees.
|
|
|
|
Post by Rebekah on Jul 21, 2014 15:32:07 GMT -5
The high pressure was all I could think of in the end.
Ironically, I'm testing the unit directly above the boiler room in the house, so it's a pretty straight, short path to the meter (NG).
The kitchen is at the other end of the house (40' further away or so), so I expect that upon being put in its new location, I'll have to readjust.
It seemed that by tightening the nipples going into the burners, I was able to reduce the flow considerably from where it was.
There's still some room to play with, but I'll wait until it's in the kitchen before I make further changes.
The oven, broiler, and Twell are next on my list.
I've been drooling over the recipe books and cannot WAIT to try out the oven. I'm going to get such a kick out of working all of my go-to recipes to accommodate cooking with the gas turned off!!
|
|
|
|
Post by chipperhiker on Jul 21, 2014 22:06:41 GMT -5
Aye, aye, Captain Chuckie! I also moved it over here to the restoration and maintenance category, so it will be easier to find the gas adjustment ufo if our search engine ever croaks again.
|
|
|
|
Post by Rebekah on Jul 26, 2014 9:21:41 GMT -5
Where I left the initial post, I had tested the burners and found that the flames weren't right. Some of this will be repeated procedures if you've read all of the back & forths between then and now, but this post contains added photos.
The first thing I did was to put the burners through the self-cleaning cycle of my other oven. When there was no improvement (perhaps even worse flames), it was suggested that I boil them out in a washing soda solution. PLEASE LET ME SAVE YOU FROM THE HEARTACHE ... DO NOT USE AN ALUMINIUM PAN!!!!!!!! The washing soda reacts with the aluminium. I was thankful that I had the extractor on, and that we went shopping while the burners were soaking. Hydrogen gas can be given off, apparently!! Very sadly, the pan (my vintage pressure canner; the only large pan I'd brought up from the basement yet) suffered quite badly. A layer of aluminium was stripped off the lower sides, and the bottom is horribly rough now. I really don't think I'd risk pressure canning in it any more just in case a weakness somewhere in the bottom were to cause the whole thing to explode. Sigh. Then - to make matters worse - the burners looked awful!!! You can see where the burners were fully submerged. I looked up what would react with calcium carbonate (aka washing soda / CaCO 3) to try to get any residual crystals off of the burners, and came across Sodium Hydroxide (aka lye / NaOH). I figured I had nothing to lose in trying to soak the burners in a hot weak solution (as a soap maker, I have that stuff on-hand). There was quite a lot of scum that built up on the surface, and a precipitate was quite evident at the end. I treated the burners as cast-iron pans subsequently, spread a layer of oil on them, and baked them. They came out looking MUCH better. I also found the rattle culprit. It resembled a nail without a head (on the left of the picture - I used the open hair pin to wiggle it free), and fit the burner ports perfectly. My guess is that someone tried to clean the heads, and lost this bit inside. I decided to record a video while adjusting the burners, to help anyone else who might be in a similar predicament. It's above in the other posts - I'm not going to embed it again here. The resulting flame can be altered by adjustment in three places: - gas lever at the front of the stove
- air intake at the back of the burner
- gas nipple/nozzle [correct name: orifice cap / gas adjustment cap] at the end of the line (this is what the burner fits over)
When my gas levers were up all of the way, the flames were high and yellow. Reducing the gas, resulted in a much better flame with no yellowing, so I permanently fixed this by tightening the orifice caps. The sparse flames from the ports were corrected by reducing the air intake openings. You could say that the excess air was causing the flames to be blown out from the inside. On full gas at the front of the range, the flames were around half of the previous size, with good colour. The gas still needs reducing, but that will probably be done once the stove is situated in the kitchen. The Thermowell was relatively easy to adjust (once I had a better idea of what I was doing) - it was just a case of tightening the orifice cap, as the flame was too intense at full gas. The broiler and oven both have a similar interface: the "mixing pin". The mixing pin comprises an orifice cap and an air shutter. The air shutter becomes movable once the screw on its face is loosened. A simple as this sounds, however, it was a real pain. The broiler was especially difficult - partially due, I believe, to the fact that the flames actually exit on the underside of the burner, so it was very very difficult to gauge how long and of what quality they really were. Lights off!!! (Darkness helped considerably.) I am a little concerned about the collection of flames in the back corners which result in considerably height over the rest of the flames. I don't want hot-spots. The range is more or less tuned up now. I cooked my homemade veggie burners on the grill the other day with great success (though I did start wondering about getting/making a cast iron griddle to fit, as cast iron takes far more of a beating). ("Make???", I hear you say! Yes. My father 'made' one for my mother out of a cast iron bathtub that was being throw out back in England in the 80s. They couldn't find one over there, so rather than having the extended family try to ship one from the US, dad got creative!). It's still being used today.) Then, I made chilli and brown rice using my double pots. There were a lot of frozen veggies in the chilli, so I used 10mins gas with that, added the rice for another 10 minutes of gas, and then turned it off. 2hrs later, hubby came home to a piping hot dinner. Hubby needs to get me a new compression fitting for the very small section of aluminium tubing which broke off from behind the thermostat (there's enough tubing still there to make a connection), as I'll not have a pilot until then. I hear that the autoparts store(s) might sell a replacement. The 'cooking with the gas turned off' concept seems to rather rely on the top-up heat from the pilots, so until this is fixed, I cannot run a full test. For burner regulating purposes, the below details the flame heights. My model A Instructions are missing a section from the middle of the page which contains valuable information, so I've had to rely on some information from other sources. IDEAL FLAME HEIGHTS:cones should be "soft" - or, to use the words in the instructions, "clear cones, but not too sharp"Top Burner Pilot: 1/2", Blue Top Burners: 3/8", Blue Oven Pilot: 1/2", Yellow (adjusted at the small brass valve at the inlet fitting of the thermostat) Oven Independent Pilot: 3/4", Yellow Oven Burner (heating): 3/8", Blue (test at 350F) Oven Burner (residual): 1/8", Blue (test at 70F after testing heating) Broiler: 3/4" (model B) 3/8" (model BZ), Blue Thermowell: 3/8", Blue Thermowell Pilot: 1/2", Yellow |
|
|
|
Post by mach12 on Jul 26, 2014 11:46:25 GMT -5
Wow bekah - I thought my dad was the only one who ever made a griddle like that. One of our neighbors had a big cast iron utility sink in their basement and the frame it was sitting on rusted out and it fell and hit just in the wrong place and cracked. My Dad cut the side out of it for a "camping griddle" but it ended up being used for a lot more than camping. Best thing ever for cooking pizzas in the oven, even better than a pizza stone. Dad always had an eye out for "repurposing" stuff long before it was trendy to do it. He was an engineer for Boeing and really put the science into it too. Boy does that bring back memories!
Edit: If you want to clean up the canner you can go to the auto parts store and get a spray bottle of Eagle 1 etching wheel cleaner. Awesome stuff. It'll etch the surface slightly and turn it a dull white. Then rinse it well and take a new Brillo or SOS pad with the soap on it (the soap is important as a lubricant so the steel wool doesn't scratch the aluminum) and a bit of water and do a light circular scrub until the shine returns. It'll look so nice you won't want to use the pan. Light pitting won't hurt the cooker and according to both Wear-Ever and Mirro is considered normal. |
|