|
|
Post by Chuckie on Aug 22, 2012 18:43:38 GMT -5
Okay, Chuckie. Your assignment now is to take MANY pictures and step-by-step photos of the rehab for us all to drool over. So HURRY UP!!!! Okay, it has started!!! Monkey went bday shopping for me today, so I had the day to meself!  Here's the interior of the BIG oven door "before" Note the position of the oven floor dampers, AND that there are two of them:  And here it is after:  The little door has quite a bit more pitting, but not unlivable. It did NOT clean up as well as the big one, but, again, for US, it's fine. Not much for resale value, but don't foresee THAT happening!! . Note the position of the floor damper here as well, right next to the door rather than centered:  And after: Here's the well before; I thought I'd taken an "after" but guess not; will update this message and post one tomorrow. There seems to be a LOT of hard water stains too, that Dawn Power Dissolver doesn't TOUCH:  The bottom of the well is pitted badly--BUT not all the way through. Again, good enough for US, unless I look @ it once I get the top off, and decide I need to replace it. I'll try some lime-away on the stains too.. I want to get the ovens cleaned FIRST, then hook it up to gas, and test drive them b4 proceeding. The gas valve for the big oven spins too freely IMO, so I'm hoping it is NOT shot. The shaft is turning along w/the handle, so maybe that is just the nature of the beast. The control for the regular sized oven seems to function just like our Isabella. BTW, this little bit of work took over THREE hours and a WHOLE BOTTLE of D.P.D!!!  I told the local Mom & Pop hardware store to lay in a BIG supply, as I'd bought the last one today!! More photos as things progress. Keep your fingers crossed, and wish me luck!!! CHEERS! Chuckie |
|
|
|
Post by jhmack on Aug 24, 2012 7:05:52 GMT -5
Oh, Chuckie, this is looking FINE so far! And an Imperial--hoowah! It is a thing of great beauty. I'm running out to buy cleaning products you and others have suggested for working on my Chambers, which I pick up tomorrow (I'm SO excited!). Thanks again for sharing all your knowledge, experience for us newer pilgrims.
Happy Birthday, too!
|
|
|
|
Post by Chuckie on Sept 4, 2012 20:58:47 GMT -5
Did the small oven today, it was pretty nasty!!    Although Todd says Don Mattera advises against reporcelaining the interior--due to warping from the heat in the process--this one is bad enough after 2 hours cleaning, that methinks it will have to be redone:  I hooked her up to gas today to see if she was NG or propane. Glad to report she lit up NICELY on NG:  What MOST impressed me was the 'pilot' hole--on THESE burners, it shoots up a flame approx ONE INCH--w/o the pilot tube connected!! On our "B", it barely puts out any gas--maybe 1/4"--to ignite the burner. I have NOT examined the burner close enough--maybe it has a tube from the orifice insert hole that feeds directly to the pilot hole. The burner flames were burning absolutely perfect!!! The oven burner is another matter. I put it in the little oven, but I'd had seen that the tube feeding the burner had been 'squeezed down'--maybe on accident, I dunno. I know from redoing the house here, we had an old gaslight that someone had 'crimped' the arm in an apparent attempt to squeeze the gas down. Perhaps this was the same situation. I was just attempting to see if the t-stat worked on the oven, so I knew where I stood. On the big oven, there is something compromising the mechanism--maybe the dolly we have it sitting on  --so I didn't attempt to test it... CHEERS! Chuckie |
|
|
|
Post by pooka on Sept 5, 2012 4:13:51 GMT -5
That is pretty cruddy, but vastly improved after cleaning. Those six headed burners are pretty awesome. Here is a picture of the ones from my model 7141 when I was testing them in my model 74. They wouldn't sit flat because the support bar is a little different, but well enough to get them to light up. You can kind of see the big flame coming out of the pilot tube holes like you're talking about. Plus you can see a direct comparison to the regular four headed burners that most stoves have 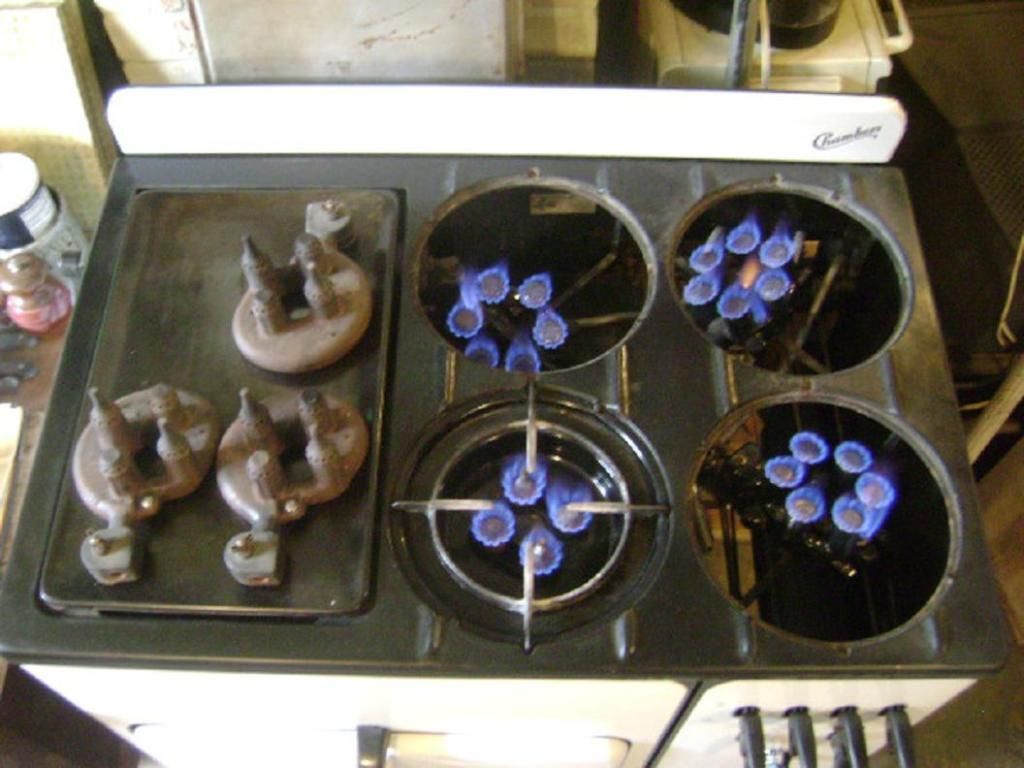 I took this picture while standing on a chair, in the afternoon without the flash, & the lights in the room turned off. There was some light coming in the west facing basement window on my left, as you can see from the shadows it casts. I took another with the flash on, but they came out like yours. These big burners are pretty mesmerizing. While testing them, I let them burn for a while because they were so cool to stare at compared to the regular ones. ;D |
|
|
|
Post by sporko on Sept 5, 2012 9:15:29 GMT -5
Chuckie, is it possible that the small oven is shared with another model of the same era... so that you could just drop another oven interior into it instead of trying to re-plate yours?
|
|
|
|
Post by Chuckie on Sept 5, 2012 9:45:58 GMT -5
Chuckie, is it possible that the small oven is shared with another model of the same era... so that you could just drop another oven interior into it instead of trying to re-plate yours? I'm gonna have to pester Don Mattera some more and ask him. I think it's the same size as a Model A, but not 100% positive. I also have a "C" parts stove, IF the oven boxes are the same size... I kick myself NOW for NOT buying that Model A @ the farm sale last winter, BUT @ the TIME I have no use for it. Hindsight IS 20/20! CHEERS! Chuckie |
|
|
|
Post by pooka on Sept 5, 2012 11:02:58 GMT -5
Chuckie, I believe it is the same as a model A oven. In this piece of literature of your stove, it is refereed to as a "standard "A" oven.  I believe the oven box itself was virtually unchanged from the model 1041 on to the model D. The only changes were that they moved the hole in the side for the tail of the burner to pass through from the middle of the side on the earlier models with the No. 1125 burner, to the rear of the side for the A's that had the No. 3684 burner, finally to the front of the side on the B's,C's & D's that have the No. S139B burner. Also on the B's onward, they increased the size of the bottom air intake. One last change is that they altered the front of the box, because I believe they changed the way the cast iron door frame mounts to the oven box, & they changed the design of the door frame slightly.  |
|
|
|
Post by Chuckie on Sept 5, 2012 11:18:33 GMT -5
Chuckie, I believe it is the same as a model A oven. In this piece of literature of your stove, it is refereed to as a "standard "A" oven. Thanks, pooka, that answers THAT question! Now all I gotta do is find an "A" in decent shape in the KC area, and I'm in like flint! Maybe the oven boxes are interchangeable. There was no difference between the cast iron bottom of my M.I.L.'s D, the "C" I did or the "B"s I've done, so maybe the same will hold true for the oven boxes. Anyone know? Guess it's time for me to break out the old tape measure huh! ;D CHEERS! Chuckie |
|
|
|
Post by pooka on Sept 5, 2012 12:56:57 GMT -5
Chuckie, chambersqueen who just listed all those part from an early model A might be able to help you if the oven box for the one she parted out is usable. I don't know what the shipping would be, but it's an option.
|
|
|
|
Post by Chuckie on Sept 5, 2012 13:54:45 GMT -5
Chuckie, chambersqueen who just listed all those part from an early model A might be able to help you if the oven box for the one she parted out is usable. I don't know what the shipping would be, but it's an option. DUH!!, thanks Pooka, I just emailed her!! CHEERS! Chuckie |
|
|
|
Post by Chuckie on Sept 10, 2012 17:55:51 GMT -5
WOO-HOO!!! Got the burners for both ovens cleaned up today, and fired the ovens up. The little one, after 20 minutes, I just barely moved the control off of 400, and the oven shut off. I opened the door, and OILA!, the thermometer said 400!!! ;D On the big one, I had to adjust the orifice enough to just keep it burning. Once I finally got it adjusted to the recommended 3/8" flame, it burnt nicely. After 20 minutes, temp was 350. After 35 minutes, it was up to 450!!! I (again) barely bumped the stat, and it shut down, so that one must just need adjustment. Hip-hip, HOORAY!!! To have had BOTH those repaired would've been more than the cost of the stove!! The pilot tubes are either plugged or turned off, so I couldn't adjust/address the bypass flame. I'll get the safety pilots installed, and then go from there. BTW, Don Mattera, Al and 58limited--are the back holes on your smaller oven burner NOT drilled all the way through? That's the way they appear on our smaller burner. I jabbed @ them with an icepick, etc, and the were flat out s-o-l-i-d cast iron. All the rest of the holes on BOTH burners were fine--I mean some junk in them that I had to poke out, but FAR from 'solid'. IF you get a chance, could you have a gander at it & let me know? I am just SO PUMPED that the T-stats work!!! ;D ;D ;D Now I can start removing the top/well/broiler & tearing this baby down for total restore. I'll send burner pics, once da Monkey shows me how to turn off the flash on the digital camera. DOUBLE CHEERS! Chuckie
|
|
|
|
Post by lwagne on Sept 11, 2012 16:11:30 GMT -5
"I'll send burner pics, once da Monkey shows me how to turn off the flash on the digital camera."
Put your finger over the flash!! ;D ;D
|
|
|
|
Post by Chuckie on Sept 11, 2012 17:22:45 GMT -5
"I'll send burner pics, once da Monkey shows me how to turn off the flash on the digital camera." Put your finger over the flash!! ;D ;D W-e-l-l-l-l, I was down to me Mater's today, and I found a book online for our cam. I turned OFF the flash, and took TWO pix I believe, and promptly got told the cam was "outta memory".  I'll post those, have da Monkey clear it out, and start over. Today was a VERY good day--got ALL the gas lines disconnected, the top loose (MUCH easier BTW than a "B" or "C"!!). Every thing was going GRAND, then I promptly busted the set screw off that holds the broiler arm on!! And I had soaked & soaked it in WD40!!! Methinks I've got my buddy convinced to come down @ noon Friday when I get off to use an easy out & remove the bastard!! Those broiler arms give me MORE PROBS than ANYTHING ELSE I've dealt w/on these stoves!!! Also, one of the 'ears' that hold it is busted--like the one was on our Isabella--BUT I did NOT do THAT. chamberscommune.proboards.com/index.cgi?action=display&board=maintenance&thread=1484&page=1#12648Alas, my initial search in the broiler produced no such piece laying in the bottom of the box... I will update this when Monkey gets the pix downloaded... CHEERS! Chuckie |
|
|
|
Post by Chuckie on Sept 14, 2012 14:23:59 GMT -5
OK, I got the tag off the thermowell cleaned up enough to read. Top numbers are 5-53393. On the bottom line, it reads 7961-B4 or BA.
Anyone w/any clue of the age?
CHEERS!
Chuckie
|
|
|
|
Post by pooka on Sept 14, 2012 15:20:48 GMT -5
If the cypher I've been using is correct, that would be 1935. My little model 74's says, Style 74 B2 Serial 5-51505, & my big model 7141's says, Style 7141 A7 Serial 5-21869. So if they were using a strictly numerical 1 to 10 sequencing of serial numbers for all stoves, regardless of style number, my big stove was made first, then my little stove, & then yours was made after them, all in 1935. At least, that's my best guess. I'd also say that last character is a "4" & not an "A".
I don't yet know exactly what those codes at the end mean, but I do know that on the older stove of the 20's, it designated which side the oven was on & the color.
|
|
|
|
Post by Chuckie on Sept 15, 2012 16:11:15 GMT -5
BACK down there today--here's a pic of one of the burners going, before I "destroyed" her in "tear-down": Had a shot of ALL them going, Monkey deleted it somehow!! Top off, fronts starting to come off:   Thumb latches b4 take off:  View from rear of "innards":  Small oven thermostat:  Small oven thermostat 2:  Big Oven Thermostat. Notice it's MUCH more corroded than the small one, BUT it was STILL WORKING b4 tear down!!:  Top view:  Big oven top:  Small oven top:  Keep in mind a LOT of these pix are to remind ME how to put her back together!! Can't get the screws to come loose on the inside of the smaller oven door. The "L" hinge on it is busted, so I HAVE to get it off to remove. Can always drill the heads off IF the overnight soak of WD40 doesn't budge them... CHEERS! Chuckie
|
|
|
|
Post by jhmack on Sept 15, 2012 17:14:52 GMT -5
Wow, Chuckie, you got a LOT done today! Does your thermostat have a long rod into the oven? Mine does, and I'm a little puzzled about taking it out and cleaning it. I know the handbook says how to get it out. The rod just seems so fragile and wobbly on mine. How are you going to handle yours? (If you have one, that is...) Maybe I should switch from PB Blaster to WD 40... it seems like you got yours stripped down lickety split!
|
|
|
|
Post by Chuckie on Sept 15, 2012 18:29:13 GMT -5
Wow, Chuckie, you got a LOT done today! Does your thermostat have a long rod into the oven? Mine does, and I'm a little puzzled about taking it out and cleaning it. I know the handbook says how to get it out. The rod just seems so fragile and wobbly on mine. How are you going to handle yours? (If you have one, that is...) Maybe I should switch from PB Blaster to WD 40... it seems like you got yours stripped down lickety split! : I had the top taken off Friday, along w/the other two front panels, but NOT the center one where the controls are. That one was a P-A-I-N today, and took QUITE some time. I spent about 5 hours working on it Friday eve. I started about 11:00 a.m. today, and it was nearly 3:00 b4 I left, so I did NOT 'sail' through anything... Just about EVERY bolt/nut I touched was "frozen" in place. For the next restoration circa A.D. 2062, that person will be able to tell via my DNA samples--a/k/a HIDE skinned off--that I was the one that did the previous restore. I added a few centuries onto my Purgatory time too, all the swearing that went on...  I too need to remove my t-stats, and am TRULY dreading that, as my capillary tube(s) are brittle as well, and I DON'T want THAT cost added in to things!! IF I come up w/a magic bullet--besides patience & lots of WD-40--I'll share it w/you... And "patience" is NOT one of my fortes I'm sorry to say.. CHEERS! Chuckie |
|
|
|
Post by Chuckie on Sept 16, 2012 16:31:00 GMT -5
...♫ and the beat goes on ♪... Down today, started disassembling the bottom of the cook top. Here's b4, nuts/bolts soaking in WD-40:  Only had ONE stubborn bolt on the broiler box. FINALLY just jiggled the whole box back/forth, and the head moved a little, then I got it right out. The thermowell added about another 10K years to my Purgatory!!! That "dear" screw in the front would NOT cooperate!! Notice the Exxon oil slick in front of the well in this pic:  I finally did the same thing as the broiler. I had gotten the back ones out, and "rocked the box" some, and the head would MOVE, but STILL wouldn't budge w/a screwdriver!!!  My Da (Lord-have-mercy-on-his-soul!) had a set of alligator vise grips in his old toolbox. Got them, squeezed them down on the head, and after "gentle" (NOT!) persuasion, she came out!!! I'm taking the broiler box over to my same buddy who got the bolt out and see if he can drive the pin out of the arm so I can pull the guts out. The broiler box needs to be reporcelained BADLY too!! So I have to get ALL the mechanism off. The top/drip rings/grates are ready for IPE as well-- IF the lottery fairy visits REALLY SOON!! We haven't decided yet if we'll have the broiler burner and pan lift arms re-nickeled or not. Seems like a BIG expense for something that doesn't actually "show". We'll see... CHEERS! Chuckie |
|
|
|
Post by chipperhiker on Sept 20, 2012 17:30:06 GMT -5
Thanks for sharing all this, Chuckie. It's really interesting for those of us who have never laid actual eyes on the fabled Imperial.  |
|
|
|
Post by kellyjo40 on Sept 23, 2012 20:53:26 GMT -5
Chuckle, just sell a couple of you "little" stoves to pay for the Imperial restore. You don't have time to cook now anyway ;0)
|
|
|
|
Post by Chuckie on Sept 25, 2012 21:44:18 GMT -5
Started cleaning the gas lines/orifices today: Dirty gas lines: :   Oila, all cleaned!!!! Oila, all cleaned!!!!  You can see a pilot line/'copper' line barely visible in the forefront of pic #3 above. They shall BOTH be replaced as the pilot is TOTALLY PLUGGED (good call, pooka!) and the copper is NOT original nor is copper copacetic with natural gas. I may wind up replacing some MORE of the gas lines, as they have some pretty good 'unnatural' kinks in them as you can see. The burners/ovens were working FINE on the test run, but I do NOT want to have to tear it apart again IF one of the lines should prove to be too kinked to function... Notice how shiny the orifices are:  That's because on the Imperials, they are SOLID GOLD---NOT!!! That's because on the Imperials, they are SOLID GOLD---NOT!!! Day by day, I make progress, although SOME DAYS, I feel like I'm just treading water and falling BEHIND!!! I had this WHOLE POST ready to go, and Firefox CRASHED, and I had to repost EVERYTHING!! Chuckie |
|
|
|
Post by pooka on Sept 26, 2012 12:21:37 GMT -5
Chuckie, you certainly are a whirlwind. I wish I had your energy. As you are discovering that so much of the mechanics of these older stoves is so very different than the B's & C's, but the systems are the same. On those pilot line, some of the pieces I removed from my model 7141 were blistered & cracked from the internal corrosion. That was very discouraging. Pilot lights were a new thing at the time these stoves were made & they hadn't quite perfected them yet. The model B's pilots are a vast improvement, & that's what I'm going to use in my Thermowell & maybe in the oven, unless I put a safety system on it. For those who don't know what we're talking about, here are some pics. ;D These are what my model 7141 had for the oven on the left & Thermowell on the right. They are permanently crimped onto the aluminum supply line.    This model B pilot is worlds apart as a better design.  |
|
|
|
Post by Chuckie on Oct 1, 2012 20:01:18 GMT -5
Back @ it the last few days. Got the manifold disassembled, and the valves cleaned up. Here's the "pre" tear down--note my cluttered bench, and why I cuss so much because I can't FIND things!! :  Actually, that clutter is on the end of the bench by the vise that I had the manifold clamped in. I DON'T use that end of the bench (normally) atall, hence it is even worse than the other end! Disassembled valve, laid out in order of disassembly: Valves all cleaned up & greased--I even painted the connectors for the ovens/thermowell in high-heat black: Valves all cleaned up & greased--I even painted the connectors for the ovens/thermowell in high-heat black: Small oven thermostat prior to cleanup: Small oven thermostat prior to cleanup: And here's after: And here's after: I may work on the "looks" of it more, BUT I'm TERRIFIED of busting the sensor off, losing the charge, and then PAYING to have it rebuilt! Besides THAT, it'll never show anyways! That shiny piece is where I clipped off the pilot line--since I'm installing the safety--bent it over w/pliers, then mashed it in the vice, so I won't have to worry about leaks later. Hugh's Place is making me the three missing shelf brackets @ the tune of $150 each. Guess that's not bad if you say it fast enough, but was NOT figured into me original budget. I tried to connive him into letting me do them later--like when the stove was all done--but he said he was in the process of selling the Imperial he had, so I had to get the brackets cast from the originals b4 it left the shop... I have the broiler box, grates/drip pans, and stove top loaded in the car for a trek to IPE tomorrow. I told Jeff I could NOT pay for everything "up front" ( see paragraph above), but I had NO INTENTION of taking anything away from there until the bill was paid in full. He said NP, he'd work w/me on things, just get it down there & we'd go from there. Stay tuned!!! CHEERS! Chuckie |
|
|
|
Post by jhmack on Oct 1, 2012 21:12:08 GMT -5
Wow, Chuckie--I gasped at $150 per bracket....
As you know, I'm TERRIFIED at the whole prospect of removing the thermostat, so it was good to see you've extracted yours successfully. What did you clean it with, gingerly as I'm sure you did, to get it so shiny again? And, is Hugh's Place a business in KC? Jane
|
|
|
|
Post by Chuckie on Oct 1, 2012 21:44:39 GMT -5
Wow, Chuckie--I gasped at $150 per bracket.... As you know, I'm TERRIFIED at the whole prospect of removing the thermostat, so it was good to see you've extracted yours successfully. What did you clean it with, gingerly as I'm sure you did, to get it so shiny again? And, is Hugh's Place a business in KC? Jane Hugh's Place is located in Louisiana. I cringed @ $150 per bracket, but what else am I gonna do? Guess when you think about it, they have to be hand-crafted---sand molds made of each, and then poured cast iron. I wish I could've waited a year or so after I got the stove re-porcelained & reassembled to spring for those, but they implied "now or never". I just hope the foundry keeps the mold for any later poor souls... As for the thermostat, I gingerly removed it from the bracket. For the last Chambers I restored, I purchased a brass wire-wheel that fits a bench grinder. I made DAMN SURE I had the sensor tube away from the wheel, and cleaned the thermostat on there. I then used steel wool to clean more of it--especially near the sensor tube. Again, I thinks it looks OK "as is"--in that no-one will ever see it again, but us! Here's a before/after pic so you can see the difference side by side: I also used said brass wire-wheel to clean the valves, orifices and supply tubes. Again, you just barely touch the item to the wheel, and the brass being soft, won't damage it--IF you go at it lightly... CHEERS! Chuckie |
|
|
|
Post by jhmack on Oct 2, 2012 17:42:32 GMT -5
Wow, what a transformation! It's so cool that in the 'after' you can see the numbers! I don't have a wheel. I have a dremel, though. Do you think that would work, with a brass wheel attachment? Of course, it would take a long time and the sound will give me nightmares of being at the dentist, but on the other hand, I have only one to clean...
|
|
|
|
Post by pooka on Oct 3, 2012 12:05:22 GMT -5
Seeing those numbers on the side of your thermostat got me to thinking. I didn't think mine are marked at all. I looked, & sure enough, the only marking on the one from my 7141 is a "B" stamped near where the line for the sensor bulb comes out. It is otherwise unmarked. I looked up those numbers on yours. The first number under where it says "PAT NO.", is the patent for the adjustment valve for the by-pass. The second number under where it says "MODEL", is the patent for the thermostat. Both those patents were granted in May 28th & April 23rd of 1935 respectively, so yours couldn't have been made before those dates. Mine, being unmarked could have been made before, but the thermostat patent was filed for on April 3rd of 1934, so I don't think they couldn't have been made much before that date. I never took the thermostat off of my model 74, so I'm unsure how it's marked. Another thing I noticed is the different valves used for the pilot light & how they're mounted. Yours is screwed into the side of the fitting for the gas line, but mine is screwed directly into the side of the thermostat itself. Plus I've seen it screwed into either side of the thermostat, so since it's an add on, there apparently was no standard way they were installed. Additionally, theses valves use flare nut connections. An older & more time consuming connection to make, than the compression fittings that are used everywhere else. My model 74 uses a different valve, like ones I've seen used on model B's, & it's mounted on the fitting like yours, & uses a compression fitting. All that blathering to explain that the one on my big stove kinda looks like yours, but not quite the same, see.    It also looks sorta like the one on my other little stove too, but still kinda different, see.   Plus, it's kinda like this other little stove, except this one looks like it's hooked up backwards, but I guess it works the same either way.  All that said, the year 1935 keeps coming up in my research. There seems to have been a wide variety of stoves up to & including that year, but after that, there seems to have been a paring down to much fewer ones. The only models that seem to have been made after that year were model A's & Imperial up to 1939, then, only the model B's & Imperial until they shut down for war production in 1942. I guess the depression had a way of culling the herd of a wide variety of things that were made before, to much fewer more standardized things until the war came along. OK that's enough over analyzing this. It's just that seeing those number on your thermostat got my mind working, & I had to think it through. |
|
|
|
Post by cheryl on Oct 3, 2012 22:42:09 GMT -5
What do you use to clean those parts?
|
|
|
|
Post by marka on Oct 4, 2012 12:14:01 GMT -5
Wow, Chuckie--I gasped at $150 per bracket.... As you know, I'm TERRIFIED at the whole prospect of removing the thermostat, so it was good to see you've extracted yours successfully. What did you clean it with, gingerly as I'm sure you did, to get it so shiny again? And, is Hugh's Place a business in KC? Jane Hugh's Place is located in Louisiana. I cringed @ $150 per bracket, but what else am I gonna do? Guess when you think about it, they have to be hand-crafted---sand molds made of each, and then poured cast iron. I wish I could've waited a year or so after I got the stove re-porcelained & reassembled to spring for those, but they implied "now or never". I just hope the foundry keeps the mold for any later poor souls... As for the thermostat, I gingerly removed it from the bracket. For the last Chambers I restored, I purchased a brass wire-wheel that fits a bench grinder. I made DAMN SURE I had the sensor tube away from the wheel, and cleaned the thermostat on there. I then used steel wool to clean more of it--especially near the sensor tube. Again, I thinks it looks OK "as is"--in that no-one will ever see it again, but us! Here's a before/after pic so you can see the difference side by side:   I also used said brass wire-wheel to clean the valves, orifices and supply tubes. Again, you just barely touch the item to the wheel, and the brass being soft, won't damage it--IF you go at it lightly... CHEERS! Chuckie Sand molds are a one shot deal, once cast you break the sand away from the metal. |
|


 I told the local Mom & Pop hardware store to lay in a BIG supply, as I'd bought the last one today!!
 --so I didn't attempt to test it...


 My Da (Lord-have-mercy-on-his-soul!) had a set of alligator vise grips in his old toolbox. Got them, squeezed them down on the head, and after "gentle" (NOT!) persuasion, she came out!!!

