|
|
Post by ronruble on Nov 12, 2018 21:56:52 GMT -5
My future home and future museum location The picture is what it looked like when it purchased the building; remember not to judge a book by its cover. AND Yes, it is butt-ass ugly now – but not later. 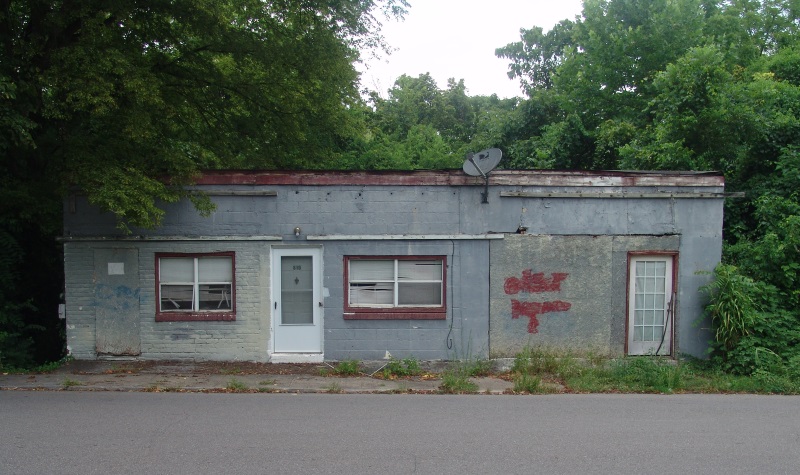 I am still trying to sell my cabin on the lake and had no plans to buy another place until it was sold. My original plan was to have a short list of places I liked and would buy one of them within 7 days after I sold my cabin. One of the places I looked at was in Jefferson City, old historic area building that needed a lot of work but had some great pluses; living area and place for a museum, location near everything (Lowes, stores, etc.); out the front door you are in the old business section of the town but out the back was like being it the country setting – trees no buildings and a stream. The inside of the one section was a one bedroom rental apartment that is in good shape, outside sucked. It needed new windows, doors, heat/cooling system, etc.. A lot of work but I loved the location, layout and possible museum location. I asked the owner if he would sell the building and how much would he want – no answer on the cost. (It needed to be cheap to make it on the list) Months later I was shortening my possible places to buy, I contacted the owner again and he would not give me a price. Finally one day I called him up to get a price and still no decision. So, I told him that if the price was between $10,000 and $15,000 he would be on my short list of places I would buy but at the very bottom of the list. If the price was under $10,000 he would be on the list someplace. I was a little mad at him that he would not give me a price (said he would sell) so the last thing I said to him was - if he would sell it for $5,500 I would go find the money within 3 days. Personally, I did not think he would sell it for less than $15,000. A few days later he calls me up and said “Ron, I will sell it to you for $6,000.” Three days later I got the money together (squeezed blood out of a turnip) and purchased the building last August. I have been doing the 'non-cost' restoration projects myself to save money. The structure is located in the historic district of Jefferson City TN and part of the building dates back to 1920. I have got approval from the historic board for windows and doors replacement, paint color and a few other things for the part of the building. The section that will be the museum (right end of building) has not been approved yet; I'm still working on the plans. Concept picture what it may look like (no awnings shown) 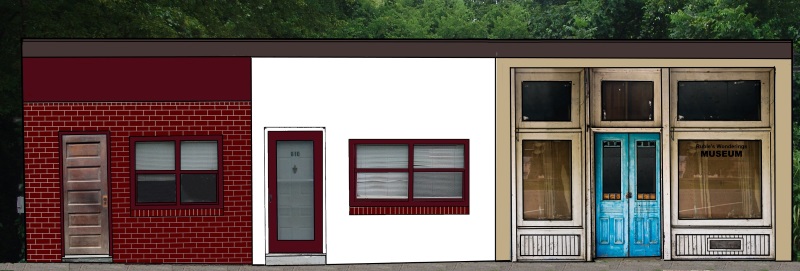 More pictures later |
|
|
|
Post by nana on Nov 13, 2018 10:05:15 GMT -5
It just goes to show--location, location, location. And the price ended up being right! I'm curious though, what was its history? No offense, but it doesn't look like your typical historic building that you'd have to get approval to make changes. Or is it just that it's in a historic district, so any changes need to fit in with the character of the neighborhood? At any rate, I bet the neighbors are ecstatic that someone is fixing it up!
|
|
|
|
Post by ronruble on Nov 13, 2018 11:40:09 GMT -5
Nana - It is in the historic section of town - approval required and it does have a little history In the early 1920's this was 3 small attached business buildings. The far left building with brick walls was built in 1920 and was first used as a barbers shop. The original center building burnt down in the late 1920's – early 1930's. The far right building was constructed around 1919, had fire damage from the center building and outside was rebuilt using wood. Around 1942 the outside of the building wood was replaced with concrete block but leaving the original wood framing inside. It was used as a farmer supply store and later as a garage. The center section between the far right and far left building was filled in with a building using concrete blocks in 1950. When they did this change they added 8 feet to the back of the far left building which is now a utility room and a bathroom. In the early 1980's the center building and are left building was changed into a one bedroom rental. This was upgraded and improved several times between 1980 and 2012; new electrical, drywall, etc.. The far left building main room (old barbers shop) is the bedroom, a small utility room and bathroom is located at the rear. The center building main room will be my living room and the small room at the back will be the kitchen. The size is 6 feet 8 inches by 11 feet; refrigerator, Hoosier cabinet, metal sink cabinet and my gas stove. Luckily I have the smallest floor foot-print Chambers gas stove that they ever made; 30 X 32 inches. It will be a very small one person cook kitchen. Photo center building looking back at kitchen area. Was going to make this one big room and started to knock out the wall and then I changed my mind (oops). 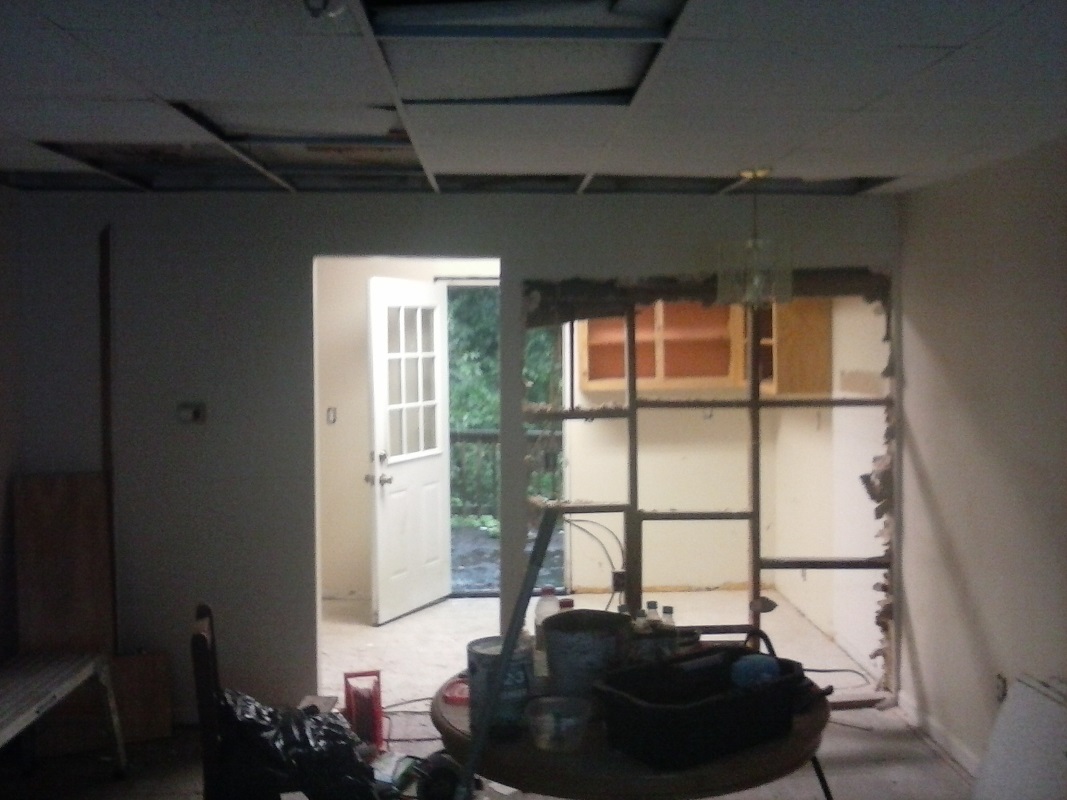 Took out the hanging ceiling and the old bad drywall ceilings in both main rooms; there was no insulation. In the corner shown in the picture (after replacing the wall) I will build a fake fireplace. This will be where I will place my modern direct-vent cast iron stove that looks like a 1863 wood burning stove. One of the building owners in the area gave me a 1890's oak fireplace mantel to use because I am restoring the building.  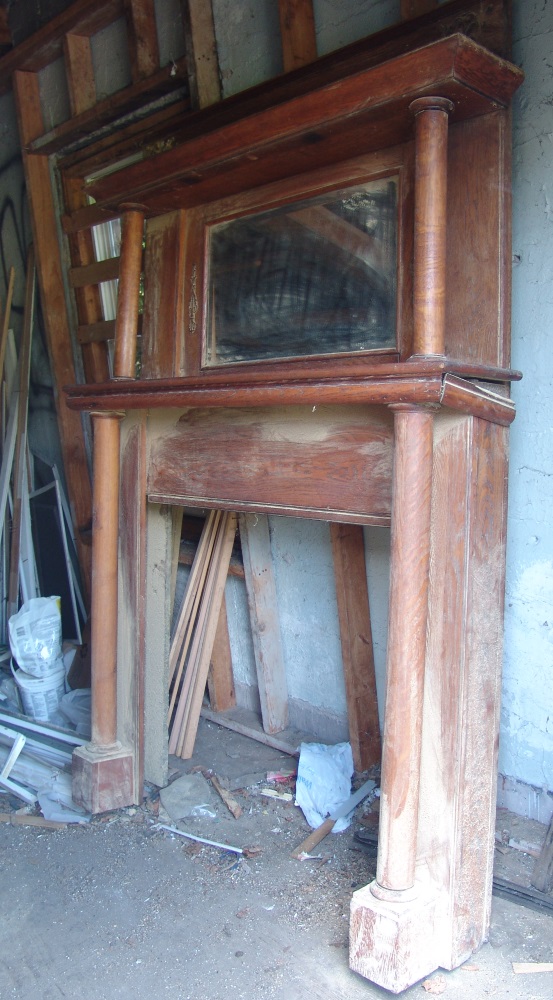 The center building has a basement with a plywood wall towards the front. I took it down and found the the the basement was not dug out for the first 6 feet from the front of the building. When this building was built around 1950, they cut down a tree but did not remove the trunk. Also found a hole in the front wall filled full of wood. I think they planned to or had a window but it was concreted over on the outside. I will fill it in during the next week or two. 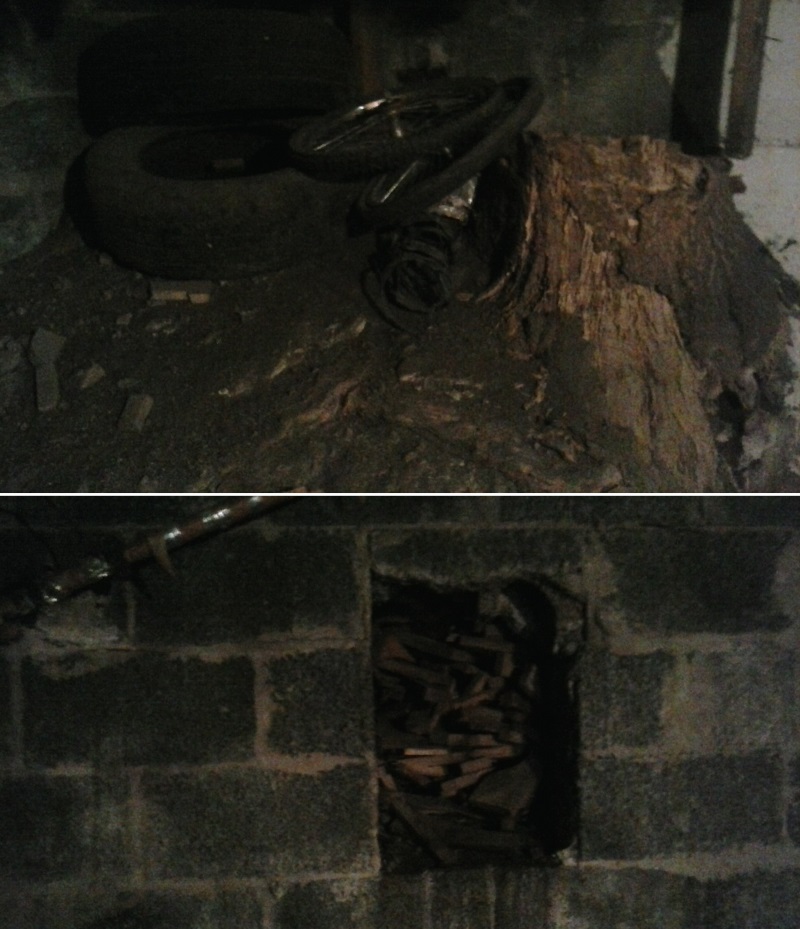 I have removed the old single pane aluminum windows and working of preparing the openings for new Pella 350 windows. The windows look small in the full pictures of the building but they are big; this one is 42 inches tall by 74 inches wide. Replacement Pella window will be around $1250+. 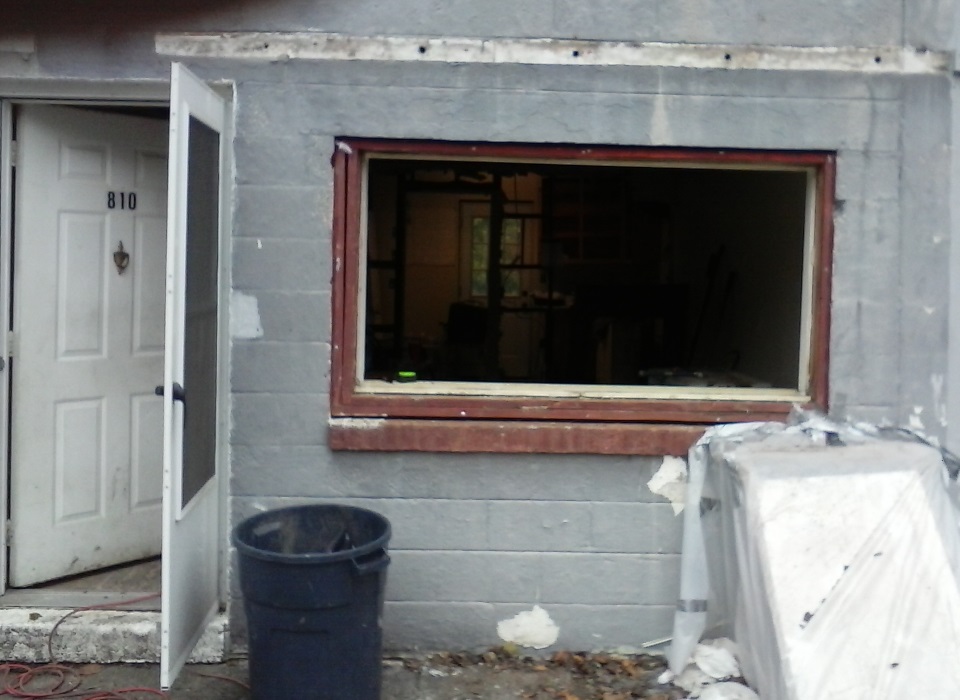 Removing all the old steel and copper water lines, replacing them with Pex and instilling a tankless water heater. Dug out the old pipe to the water meter and replaced it with Pex piping. There is a Pex pipe connection fitting that does not require the use of the ring clamping tool. Just slide the pipe into the fitting and it seals automatically; fitting connection is called a Shark-bite fitting. This is real handy if there is no room to use the standard ring and clamp tool, like at the water meter. NOTE: Before you bury the fitting in dirt, wrap the fitting with silicone tape to stop any chance of corrosion.  |
|
|
|
Post by pooka on Nov 13, 2018 12:18:26 GMT -5
It sounds cool. The building looks familiar for some reason. Not because I've seen it, but I've seen the like around here, sometimes out in the country, but also around town. I'm sure it looked very different in it's heyday. If it's a solid building, you've got a blank slate.
I admire your gumption. It reminds me of a museum in Kyoto Japan I read about called "Ukiyoe Small Museum". The owner is a woodblock print artist. The place is part artist studio, part museum. He has a sign out front that says, “Open when I wake up and close when I must go to sleep. When I’ve had enough the store is closed.” Here's a link to an article about it. Ukiyoe Small Museum Displays Cathartic Sign Stating Its Flexible HoursI wish you good luck getting it all worked out. I wish I was brave enough & had the resources to do something like it myself. I like your concept picture. It's a good jumping off point for whatever it's final form is. Awnings would transform the whole look of the place, & make it seem more inviting.
|
|
|
|
Post by nana on Nov 13, 2018 17:57:46 GMT -5
I too admire your gumption! What will you be exhibiting in the museum, besides Chambers stuff?
That stump is great. It makes perfect sense. Why go through all the trouble of pulling it out? How is it that it's in the basement, though? Wouldn't a tree be at ground level?
|
|
|
|
Post by Chuckie on Nov 13, 2018 21:45:52 GMT -5
I too admire your gumption! What will you be exhibiting in the museum, besides Chambers stuff? That stump is great. It makes perfect sense. Why go through all the trouble of pulling it out? How is it that it's in the basement, though? Wouldn't a tree be at ground level? ROFLMFAO!!! Reminds me of Granite Street in McLouth, KS. Methinks I've posted it before, but here it is again!! www.roadsideamerica.com/tip/19507Ti's SO LARGE, the townsfolk in the day couldn't move it, so they LEFT it, paving around it!!! Monkey & I do a 5K out there every year, and it's on the route. It is just in the middle of a residential street--town of maybe 200 I thought, but Wikipedia says 800!! At any rate NO signs or markers WARNING you it's there, and it's been 'barked' by cars a few times by the looks of it & the broken glass/chrome/plastic pieces in the street! ONLY in KANSAS!! CHEERS! Chuckie |
|
|
|
Post by pooka on Nov 14, 2018 0:09:20 GMT -5
That is crazy to find a rooted stump in the basement, but when you start poking around an old building, there's no telling what you'll find.
Many years ago they were doing some utility work digging in the basement of a now gone church that sat next to the old jail here. They discovered the body of a woman that still retained some of her red hair. In researching it, it was known that the old city cemetery was about there, & the only red haired woman who'd been buried there was Mary "Polly" Anthony, the wife of the town's founder, Hugh McGary Jr. When the old city cemetery was moved out to the Oak Hill cemetery in the mid 1850s, They apparently forgot to move her grave.
I'll take your KANSAS Rock in the Road & give you the Soulbury Boot in the middle of the road in Soulbury, Buckinghamshire, UK. One story says the villagers fought with the devil cutting off his foot where it turned to stone when it hit the ground. Of course others say that story was spread by the local bar to increase business.
That stump is right where ground level was when it was growing, so obviously there's been some filling. Ron said there a stream behind it, so that means the land drops down from the road to the stream. It's still an odd thing to leave. They were either too cheap, or were it too big a hurry.
Ron, it looks like you've got your work cut out for you. I hope you've got a good roof. You'd hate to do a lot of work, then have it ruined by a leaky roof. It looks like a nice space. Not too big, but with all the amenities you need. Since you're pretty much starting from scratch, you can make it anything you want. That mantle is great. It's a real statement piece.
|
|
|
|
Post by nana on Nov 16, 2018 17:11:03 GMT -5
Those were fun links! I guess naming that street in Kansas was a no-brainer. I wonder how they know that rock is 11,000 years old? That seems fairly young for a rock...Anyway, the picture of the English rock from the 40's shows the solution to everyone's problems: just stick a lampost next to it--shine some light on the subject!  |
|
|
|
Post by nana on Nov 17, 2018 7:27:26 GMT -5
It sounds cool. The building looks familiar for some reason. Not because I've seen it, but I've seen the like around here, sometimes out in the country, but also around town. I'm sure it looked very different in it's heyday. If it's a solid building, you've got a blank slate.
I admire your gumption. It reminds me of a museum in Kyoto Japan I read about called "Ukiyoe Small Museum". The owner is a woodblock print artist. The place is part artist studio, part museum. He has a sign out front that says, “Open when I wake up and close when I must go to sleep. When I’ve had enough the store is closed.” Here's a link to an article about it. Ukiyoe Small Museum Displays Cathartic Sign Stating Its Flexible HoursI wish you good luck getting it all worked out. I wish I was brave enough & had the resources to do something like it myself. I like your concept picture. It's a good jumping off point for whatever it's final form is. Awnings would transform the whole look of the place, & make it seem more inviting.
Talk about timing! I might not have really paid attention to this exhibition at a nearby museum if not for this post of yours, Pooka. Now I feel like I have to go see it. The coincidence is too much to ignore! hydecollection.org/exhibition/november-4-december-30-ukiyo-e-shin-hanga-japanese-woodcuts-syracuse-university-art-collection/ |
|
|
|
Post by dwayner2 on Nov 17, 2018 14:21:09 GMT -5
There are 15 cities in TX that boast having trees in the middle of their streets. The city of La Grange has many large oak trees in the older residential areas that are really cool to come across, but not by night. Back in the late 1930's the city of La Grange had plans to severely trim or remove most of the trees but that plan was squashed by public protests along with an article posted from the state capital. We're one of the few areas that can actually file an accident report stating "I was driving along, minding my own business when this tree jumped out into the middle of the road!" |
|
|
|
Post by pooka on Nov 17, 2018 15:59:08 GMT -5
|
|
|
|
Post by nana on Nov 18, 2018 9:38:33 GMT -5
I wish I could read Japanese!
|
|
|
|
Post by ronruble on Jan 8, 2019 21:43:48 GMT -5
Door Restoration Suggestions Needed Today while starting to restore a 1920's door to be used on the front of my new building I found that there are 4 small windows along the top edge that were covered over by wood. Background information The left section of the building was built in 1920 and was a barbers shop in the 1920's - 1930's. The door opening to this was closed off in the early 1980's when the building was remodeled into a one bedroom apartment. To make better use of the small room and make it into a bedroom, the door opening on the inside was hidden behind a wall. I am going to use this room as my bedroom and do not want an outside door; removes too much usable area. 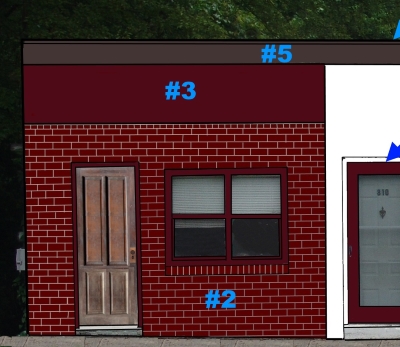 (Proposed sketch for historic board) To meet the requirements of the Historic District Guidelines, I proposed to place the boarded up section with a correct period (1920's) 'non-functional” brown painted door to fill the opening on the outside of the building. Doing this would allow someone at a later date to restore / make this door opening functional again if they wanted to. This was approved and I was given a damaged wood door from 1920 that was used in the old city hall building. 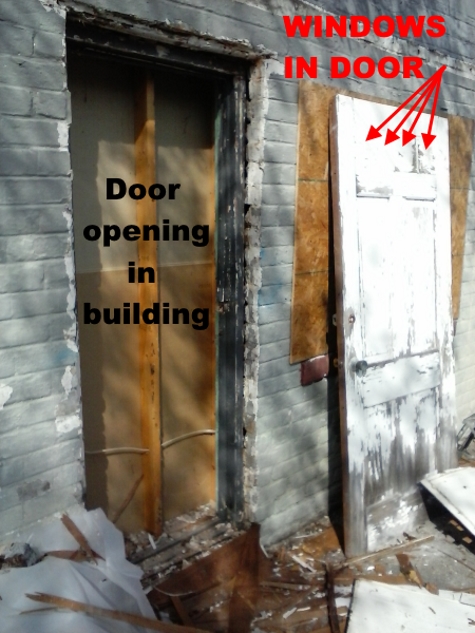 So, when I started cleaning the door to repair the damage (cracks) I found 4 wood 'patches' across the top. It turns out that these covered 4 small glass (broken) windows, 5 ½ X 6 ½ inch openings. Location marked with red arrows in photo. I would like to put something into these opening to give it a look as real windows. With glass in these openings there would be approximately 5/8 inch of open space between the back of the glass the the backside covering. Please make any suggestions or comments about what I should use in these window opens. I am trying to come up with an idea that would make it look like real window openings, (but they are not). Some of my ideas: Add glass (or Plexiglas) and paint the back wood covering behind the glass a different color (yellow?). Another one would be placing a sheet section of acrylic prismatic sheet material (used with drop ceiling lights) behind the the glass and paint the back wood covering light color or bright color or add mirror material over the wood. |
|
|
|
Post by nana on Jan 9, 2019 12:30:09 GMT -5
I'm not quite sure what you are asking about. If I understand correctly, you will have a nonfunctional door, but in order to satisfy the Historic District, it has to look like it functions. The door you happen to have has 4 little windows up top, broken now, but you want to replace where just plain glass would have been with something that will look more attractive from the outside than just plain glass because what people will see from the outside would be the back of the sheet rock of the inside wall. Is the 5/8 th inch space behind the "glass" a problem, or were you just letting us know how much space you had to work with?
If just plain glass is easiest, why not paint the back side of the glass your preferred color, or if you can get your hands on some old wallpaper samples that have a pleasing pattern, glue that to the wood backing?
|
|
|
|
Post by cinnabar on Jan 9, 2019 17:52:57 GMT -5
I am in possession of 8 beveled glass pieces from a 1920 defunct door that are not being used. That being said they are 5"X 8". A little too big, but with some creativity(placed horizontally) could work as replacements. An idea.
|
|
|
|
Post by cinnabar on Jan 9, 2019 18:03:04 GMT -5
I emailed you a photo of my glass
|
|
|
|
Post by ronruble on Jan 13, 2019 18:50:32 GMT -5
I did not get the photos; I PM my email address to you
Thanks
Ron
|
|
|
|
Post by cinnabar on Jan 13, 2019 22:15:09 GMT -5
 Hard to get a good pic, but there you have it. Beveled on both sides of the pane. |
|
|
|
Post by ronruble on Jan 14, 2019 16:02:39 GMT -5
Thanks – Great piece
But... I think I have just found an answer that will work great. Hobby Lobby sells stained glass, one called cathedral glass in different colors and it has a surface texture that looks like glass that is very old (melted glass that is running down). By using this glass with a mirror on the back side, it looks back lit with reflections of light hitting the glass textured surfaces.
|
|
|
|
Post by cinnabar on Jan 17, 2019 19:49:58 GMT -5
sounds purty
|
|
|
|
Post by ronruble on Jan 19, 2019 19:40:50 GMT -5
Glass section (4 windows) of the door I am restoring  Today's project - Moved approx. 400 sq/ft of 1920's reclaimed beadboard to my new building. I will probably use this in the kitchen which I am making in the style of 1930; black and white floor, copper painted tin ceiling, Hoosier cabinet, metal sink cabinet and Miss Jade, my 1929 Chambers gas stove. 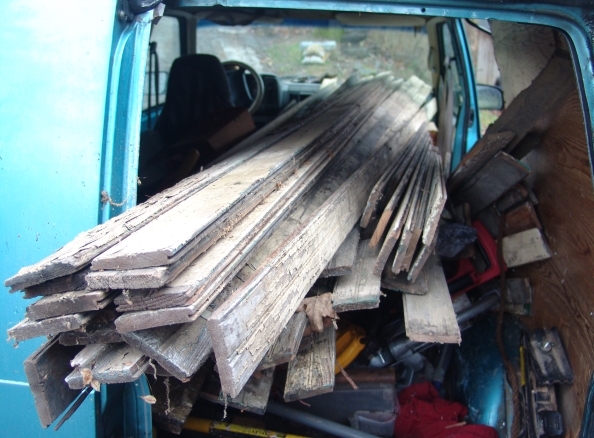 |
|
|
|
Post by nana on Jan 20, 2019 8:53:35 GMT -5
That will be quite fitting.You could make your kitchen part of the museum tour!
|
|
|
|
Post by ronruble on Feb 7, 2019 12:52:31 GMT -5
Question: Installing antique beadboard
I plan to install the 1920's beadboard in the kitchen. I never installed real old style beadboard (1/2 inch thick by 3 1/4 inch wide), only the modern thin beadboard sheets directly over drywall. At his time about 50% of the drywall has bee moved from the kitchen walls and may need to remove more for other repairs.
Question: Should I put up 3/8 inch plywood on the wall making it better to nail the thicker old beadboard, or just use day wall or do something else?
Another thought: I found pictures of early 1900's kitchen that had beadboard – installed horizontally, not vertical. If I did that, I would not need drywall or plywood.
|
|
|
|
Post by nana on Feb 7, 2019 19:47:48 GMT -5
Horizontal would be the least expensive option, so if you like the look, go for it!
|
|
|
|
Post by donmattera on Feb 8, 2019 7:52:44 GMT -5
I always use a plywood backer in the kitchen and bathroom. It makes it easier when you hang cabinets and other items on the wall. You don't have to look for a stud for example to hang a picture or a pot rack etc
|
|
|
|
Post by mach12 on Feb 8, 2019 22:43:36 GMT -5
I like a plywood backer too but my locality required drywall for fire protection. I guess it's a good idea. I put up cabinets from Ikea and they hang from steel rails that you screw into the studs so it was pretty easy in this case. I put up a beadboard ceiling but went with Armstrong Woodhaven planks since it was prefinished and I wanted to just get it up and finished. My trusses in the attic run two directions so I had to run 1x2 furring strips but it came out fine. We were looking at buy more and doing beadboard on the lower walls topped with a chair rail but when we did mockups on the computer it looked like it would just be too much. All of the books I read (and the Armstrong instructions) said to just put up drywall as a backer and then attached the beadboard with construction adhesive. I've had good luck using construction adhesive for things like that so that was how I was going to do it. It'd work fine with plywood too, though I'm a cheap sucker and like the price of drywall. I did put plywood where I was going to have a load, like my microhood. You could do chin-ups if the cheap plastic handles and stuff could handle it. Armstrong has some pretty good instructions you can get online. Might be worth checking to see is any of the info is helpful. link www.armstrongceilings.com/residential/en-us/suspended-ceiling-systems/wood-look-ceiling-planks/item/1149.html and www.armstrongceilings.com/residential/en-us/suspended-ceiling-systems/wood-look-ceiling-planks/item/1149.html. |
|
|
|
Post by ronruble on Feb 15, 2019 22:32:42 GMT -5
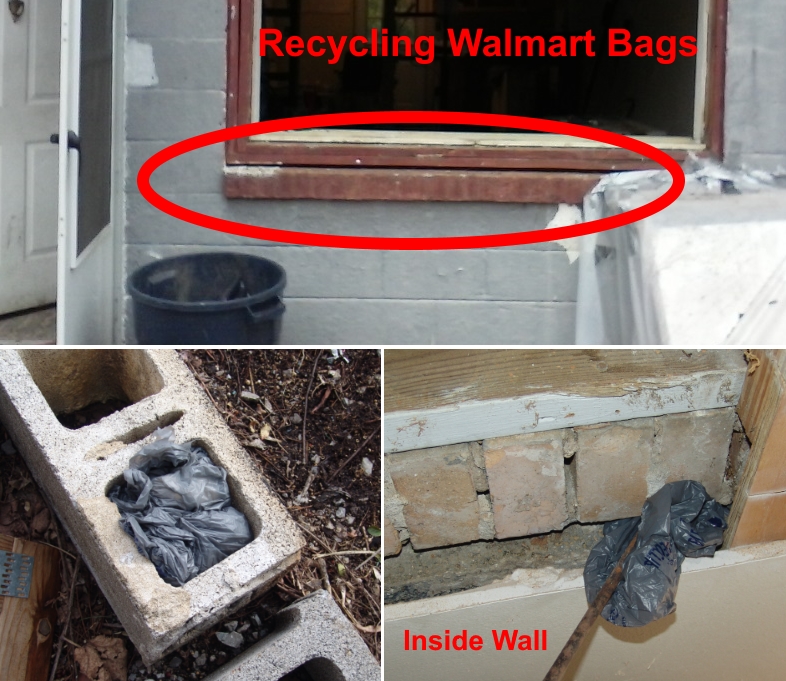 Plastic Bags Insulating Concrete Blocks Concrete blocks have two large holes in them and the depending on the density of the blocks, an 8-inch thick block wall without any other type of insulation has a thermal resistance value between R-1.9 and R-2.5. By filling the two holes with some type of insulation, the R value can be greatly improved. Cost of filling with foam or other insulating material can be expensive; using recycled plastic bags (Walmart bags) is free. The new thermal resistance value should be over R-10 average for the concrete blocks. The front wall of the center section building that I am restoring has concrete blocks with no insulation. Under the large window the builders added bricks on top of the concrete blocks. On the inside wall they placed a thin strip of wood under the bricks to provide a slight slope and then mortared the bricks in place. After 70 years this wood strip rotted, I removed the rotted wood which left a gap under the bricks allowing excess to the large cavities in the concrete blocks under the window. Before I fill the gap with under the bricks with mortar, I decided to insulate the concrete blocks under the window. I filled the holes in the concrete blocks with waded up plastic bags. I found that the cheap light weight thin plastic bags from Walmart and some grocery stores work the best. Thicker / harder plastic bags are harder to force down the holes in the blocks. I used a 3/8 diameter steel rod to force the bags into the hole and then rod the push(wedge) the bags down the hole. When the hole is full, the bags spring up like foam when pushed down with the rod. Two things: It takes a lot of Walmart bags to fill the concrete blocks. To fill 7 cavities under the window it took 1 ½ large trash bags filled with Walmart bags (I also filled 2 open cavities with bubble wrap from the basement). Use thin light plastic bags and when pushing the wadded up bags into the cavity, push the end of the bag with handles in first to prevent the bag handles from getting caught (saves time). Using plastic bags is not fast but it is free. Now that the insulation is in place, I am ready to mortar in the space between the bricks and the concrete blocks. I do not know how I will insulate the remaining blocks, but that will be done later. Bead board kitchen wall - may need drywall for fire code - we will see (waiting answer from building inspector) |
|
|
|
Post by nana on Feb 16, 2019 9:52:54 GMT -5
Reduce, reuse, recycle! As far as insulating the remaining blocks goes (and I realize this sounds like an awful lot of work), you can see where the blocks are from the outside. Could you drill holes into the cavities, and either stuff the bags in, or use that Great Stuff expanding foam to fill them, and then plug the holes back up with mortar? I have no idea if this would work in practice, but it's just the idea that occurred to me... My husband says he dreads hearing me say "why don't we just..." because it usually means lots of extra work for him! |
|
|
|
Post by ronruble on Feb 16, 2019 19:25:09 GMT -5
I think drilling 1/4 inch holes and using the Great Stuff Crack & Gap foam will be what I will use. I tried stuffing one bag through a 3/4 diameter existing hole and I found that I could not make the bag or force the bag in the downward direction. Small 1/4 inch holes will be easy to plug. I got all ready to do the mortar today and then I read the instructions; Min temperature 50 degrees during curing time and it is only 42 degrees  ....Next week maybe |
|
|
|
Post by nana on Feb 16, 2019 21:07:42 GMT -5
Holy cow, you mean my idea is the one you're going with? Wow, I feel kind of proud of myself!
|
|


 ....Next week maybe