|
|
Post by dwayner2 on Feb 19, 2019 11:10:09 GMT -5
Nana, you came up with one great idea so now you can be a Nobel Laureate that gets hired by the big universities and make $ 1 million to sit on your behind and teach one semester a year....three different universities a year. It won't matter if you ever come up with another good idea or important research, the universities will keep you around for bragging rights. Incase you missed it, paying those NL's all that money to sit on their behinds ticks me off! It's like here at Texas A&M where they paid millions of dollars to put Johnny Manziel on the cover of several news papers around the country when he won the Heisman Trophy. Then he dropped out of school to play prof football....Ha! And does anyone know or even care where he's at now?....Canada! Good gob A&M!!!  Sorry for the rant, not enough coffee yet this morning.  |
|
|
|
Post by nana on Feb 20, 2019 9:56:01 GMT -5
Usually when I get one of my "why don't you just-" ideas, it gets shot down in flames. My friend and I once spent an afternoon collecting pretty pebbles on a beach on the north shore of Long Island, which is a lot more interesting than it sounds because Long Island is actually a glacial moraine, so all the rocks we picked up were from all over the place and then polished by the sea, so they are really diverse and beautiful. We noticed they all looked better wet than dry, and she was re-doing her kitchen, and we wanted to somehow find something to do with the two bucketfuls of pebbles, and I said how about making a countertop sized frame to hold them in a single artfully arranged layer, and pouring some kind of clear resin around them that would encase them completely so the top would be nice and smooth, but the rocks would look wet and it would be really cool? Her contractor husband totally nixed that idea. I think he just didn't want to go to all the trouble. But he was the big expert, and he was the one who would be doing the work, so it never came to pass.
I still think it's a cool idea, though!
|
|
|
|
Post by ronruble on Feb 26, 2019 23:04:15 GMT -5
Next Restoration Question Right now I am working of designing a fake fireplace and will be using an antique oak mantel (pictured). It will be mounted in the corner of the room and will be used with my direct vent gas stove that looks like a 1860's cast iron wood burning stove. The inside of the fireplace will be old brick, old looking thin brick or fake brick to make it look like a real fireplace. The late 19th or early 20th century oak mantel was given to me (free!) by another building owner in the historic district where my building is located. 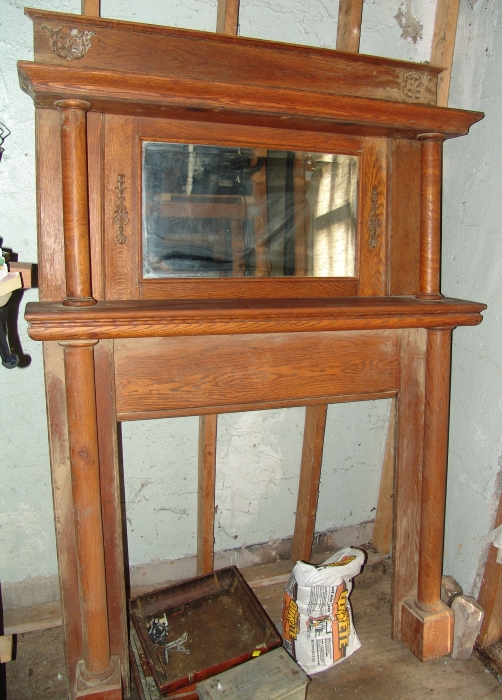 My question: Has anyone had experience mounting / installing antique fireplace mantels? If so, what should I do or more important what things should I avoid during installation of the mantel? On my inspection of the mantel I did not find any screw holes or nail holes where it was previously mounted. I read and seen videos where they use finishing nails through the sides to mount it to the wall (may have missed seeing the nail holes). The wall-mounting boards may be still attached to the mantel – will find out next week when we move it to a better location where I can work on it. I am designing the fireplace so that the direct vent pipe can be repaired or replace if required by removing the mantel and a cover board. For this reason I will probably use small brass screws through the sides into the wall mount-boards, not finishing nails. Any suggestions, warnings or hints on installation of antique fireplace mantels? ___________________________________ nana - 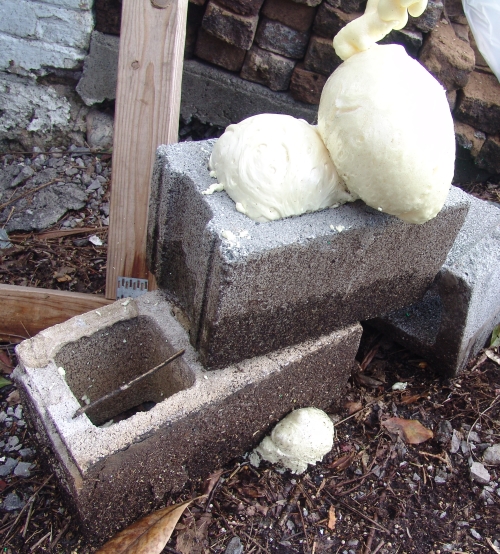 Did a test using a very old can of Great Stuff Crack & Gap foam to see how much it will fill the cavity in the concrete blocks. I used a can that was several years old (not good) and did it on a cold day (not the best conditions). It filled almost 2 blocks in a few hours but when I came back after a 2 days it grew bigger. I think a good can used in warmer condition will fill 3 or more concrete blocks and will need to wait 2 or 3 days before adding more foam in the blocks above it. |
|
|
|
Post by nana on Feb 27, 2019 18:06:46 GMT -5
You know, looking at that picture, if you're filling up blocks that are stacked up and mortared together, I hope the foam won't expand so much that it causes problems! Like the way overcarbonated home brew beer can explode the bottles!  |
|
|
|
Post by ronruble on Apr 20, 2019 12:36:56 GMT -5
Update: I have not sold my cabin on the lake yet. Still doing all the work I can do by myself without spending much money. I did cut / remove all the bad areas of my 1920's beadboard that I want to use in the kitchen. Due to removal of bad boards sections and calculation error (3.25 wide not 3.75 wide - oops) I found out that I do not have enough boards to completely cover all 4 walls in the kitchen. The kitchen will be a “one cook” kitchen, very small. It will be 11 ½ feet wide by 6 ½ feet deep. The two long walls each have a doorway; one from the living room and the other is the back door going out to the porch. I did a mock-up with having the bead board 3 to 4 feet tall all around the room. Being a very small kitchen with a refrigerator, Miss Jade the gas stove, oak Hoosier cabinet and a metal sink cabinet, most of the half beadboard wall would not show. Thinking about full beadboard wall on the back long wall and two sides. The other long wall will have the refrigerator and the long metal sink cabinet with upper cabinets which will hide most of the wall. Bright yellow walls, green trim and copper painted tin ceiling.
My main planning problem is that I keep making changes...
|
|
|
|
Post by nana on Apr 24, 2019 7:31:36 GMT -5
I like your plan. It would be a shame to do all that work to rescue the beadboard and then hide it away. Do you have enough to do the part of the wall that shows around and above the refrigerator and cabinets, or are you just going to have that one plain?
|
|
|
|
Post by wizardoftrance on Apr 25, 2019 0:04:28 GMT -5
|
|
|
|
Post by ronruble on Apr 25, 2019 17:09:50 GMT -5
More than one plan – If I use my 42 inch metal sink (single sink drain board that I have) and one 18 inch metal cabinets, I will add a window to the back wall. If I go with a 54 inch metal sink (photo of one found but not purchased) I will restore a 54 inch metal sink cabinet to go above it and put the Hoosier on the back wall (will change red handles to green to match Miss Jade and repaint metal white). I also could go with a 65 inch metal sink with two drain sinks and buy new cabinets to go above (this option would cost too much unless I find cabinets cheap and would be the full length of wall between wall and doorway into the living room - too big?). I have enough beadboard to cover three walls; both short ends of the kitchen and behind Miss Jade, above the short (60”) refrigerator the beadboard will show up well. Going with the 54 inch sink option and not putting beadboard behind the sink and the metal cabinet on the wall I may be able to cover all the walls... We will see... Placement of Miss Jade stove and the refrigerator is set but location of the Hoosier and sink (and size) are up in the air 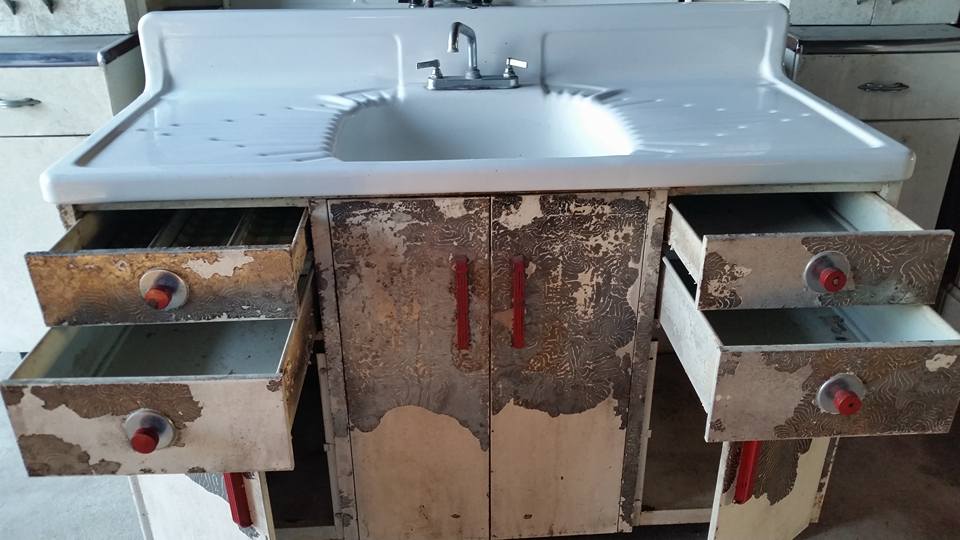 |
|
|
|
Post by nana on Apr 26, 2019 14:01:31 GMT -5
That is a fancy sink top! I don't think I've ever seen one like it!
|
|
|
|
Post by pooka on Apr 27, 2019 3:01:22 GMT -5
Yeah, I've never seen one either. The cabinet is a bit unusual too. I like the double drawers on each end.
Ron, I sympathies with your dilemma of having to try to make your plan to fit what materials you've got. Your kitchen being so small makes it a tough nut to crack. The stove & fridge are the only known puzzle pieces. Making best use of what's left is tough. Your lucky your stove is so narrow. Just what the doctor ordered for a tight kitchen. I agree to the idea of only using the scarce bead board where it'll be seen. The 42 inch metal sink & 18 inch metal cabinet is what I've got in my basement. It's all a matter of what works best for you. I'd think a double sink is overkill for a tiny kitchen like yours. Too much sink just means that much less counter space. It's a matter of how you work in the kitchen. Counter space or prep areas are what you want to try to get as much as possible. In a space that small, you almost need to design it like a ship. Maximize space with built in features where possible. A place for everything & everything in it's place.
|
|
|
|
Post by mach12 on Apr 27, 2019 22:46:59 GMT -5
When our kids were really little we had a similar sink and it did double duty as a bathtub for them. I wonder how many baths have been taken in this one?
|
|
|
|
Post by nana on Apr 28, 2019 17:22:32 GMT -5
Both of my children's first baths were in a kitchen sink. And my son slept in a laundry basket for about the first 6 weeks of his life. When I see how much stuff parents think they absolutely must have these days I smile the smile of one who knows better, but who also knows there is no sucker like a new parent. They are probably the easiest marks on the planet! I would have been one myself, except we had no money and neither did any of our friends. |
|
|
|
Post by mach12 on Apr 28, 2019 18:42:23 GMT -5
Both of my children's first baths were in a kitchen sink. And my son slept in a laundry basket for about the first 6 weeks of his life. When I see how much stuff parents think they absolutely must have these days I smile the smile of one who knows better, but who also knows there is no sucker like a new parent. They are probably the easiest marks on the planet! I would have been one myself, except we had no money and neither did any of our friends. That was us, too. I was in the Navy when our daughter and son were born and made $177/mo. with sea pay. We did fine without the extras that are common these days. Like using a dresser drawer for a baby bed when visiting family and so on. We've made up for it as grandparents and great-grandparents though... |
|
|
|
Post by nana on Apr 29, 2019 5:44:55 GMT -5
Being grandparents is your reward for having children!
|
|
|
|
Post by ronruble on May 1, 2019 9:06:55 GMT -5
Kitchen – I am down to 2 plans for the sink location. I set-up a mock sink / cabinet locations in the room to get the “feel” how it would work. What looks good on paper sometimes does not work well in real life. I am still waiting for more pictures of the double drain sink from the seller – need to see how much restoration will be required. Also in the kitchen mock-up I rotated Miss Jade 45 degrees in the corner - gives more room to be in front of the stove and it will look good too. Kitchen light – swap-meet special for $3; 2 bulb fixture circa 1920 (has 1916 date on ceramic insulator). If I can get it rewired, I will paint it antique bronze. 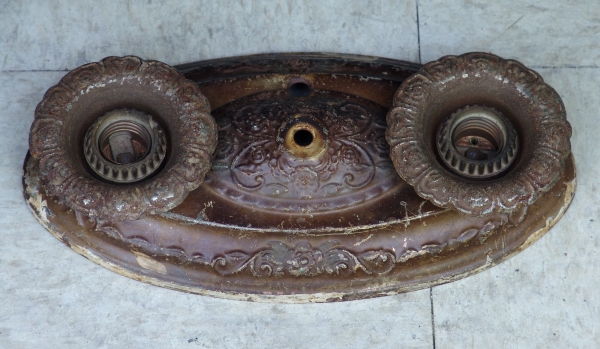 |
|
|
|
Post by nana on May 2, 2019 19:34:57 GMT -5
What's that made of?
|
|
|
|
Post by pooka on May 4, 2019 10:10:43 GMT -5
Frequently these are pale colored ceramic with the vines & flower decorations painted in bright poly-chrome colors. It could be stamped metal too though. These were from a time when you wanted to show off the miraculous new electric light bulbs. For $3, it's a steal. It should be too hard to rewire. If need be, you can still buy new socket to replace the old ones.
This would look cool with some with some vintage style bulbs. There are some great LED ones available now. I've been buying florescent ones for years, but am now going to the LEDs, because they use a fraction of the electricity & last for many years. One I got for my desk lamp a while back said it was good for twenty three years of average use. It only uses four watts, yet equals a sixty watt incandescent one. |
|
|
|
Post by ronruble on May 4, 2019 12:35:33 GMT -5
Stamped metal -
I wish it was a poly-chrome style fixture but I am happy at $3. Total cost with rewiring, painting and finishing, I should have less than $25 into this light fixture and that is a whole lot cheaper than the restored ones I have seen on eBay for sale.
I went to Lowes yesterday and to my surprise they sell vintage style porcelain light sockets with modern screw terminals for a little over $4 each - easy rewiring fix. Also while there I purchased a small metal 3/8 diameter hole plug to fill the switch hole the in fixture base. When painted, I do not think you will see where the hole is. Next step will be strip the paints / surface finish and primer paint. I plan to spray paint it copper, then after it dries the lightly spray paint it with darker bronze. With a little hand polishing to bring out the highlights of the decoration on the fixture, it should look like old bronze finish. I will post pic's when done
|
|
|
|
Post by ronruble on May 7, 2019 21:03:47 GMT -5
Kitchen Layout – mock-up I liked the 54 inch fancy metal sink but sadly I need to go with my 42 inch metal sink. I did a lot of different mock-ups and finally came up with something that will work for me. The kitchen is 6 ½ feet deep by 11 ½ feet wide with a backdoor going outside and an entry way from the living room; add a metal sink and cabinet, a Hoosier cabinet, refrigerator, and Miss Jade Chambers stove, there is not much room remaining. I am going to open up the the doorway from the living room to 4 1/2 feet wide; this makes the kitchen feel a little more “roomy” and not a tight box. The first picture is looking from the living room into the kitchen; Miss Jade's footprint is on the floor and the wood piece to the left is the mock-up for the refrigerator. The second picture is looking from the corner near Miss Jade toward the living room showing the other end of the kitchen. The reddish cover (left) is the mock-up for the Hoosier cabinet and will install one metal wall cabinet to the right end of the sink. Between the wall and the wall cabinet I plan to put one or two shelves and a small blackboard just above the sink area. There will be only 26 inches between the Hoosier and the sink – small but will work. Opening up the doorway to the living room makes it feel bigger. I will be putting in a new backdoor that will swing from the opposite side. 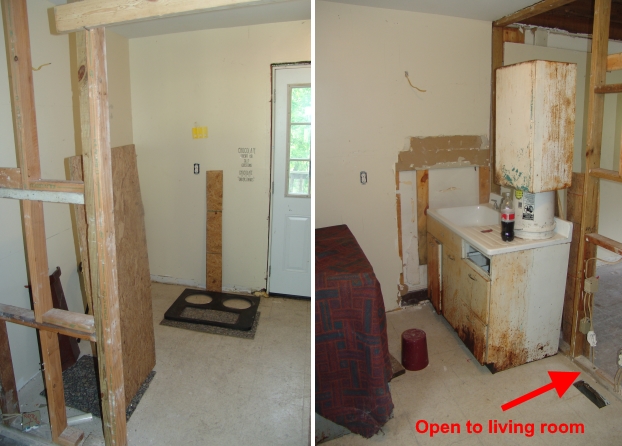 Next picture is not part of the restoration but will be in the house when done: Last year I purchased a brass bed (1871-1874) and this last weekend I found and purchased a high quality full size bed springs. I never seen an old style bed springs with flexible sliding metal strips that chis-cross the top of the large coil springs to give extra support; defiantly a high quality bed springs. They used 278 coil springs to make this and none are missing. 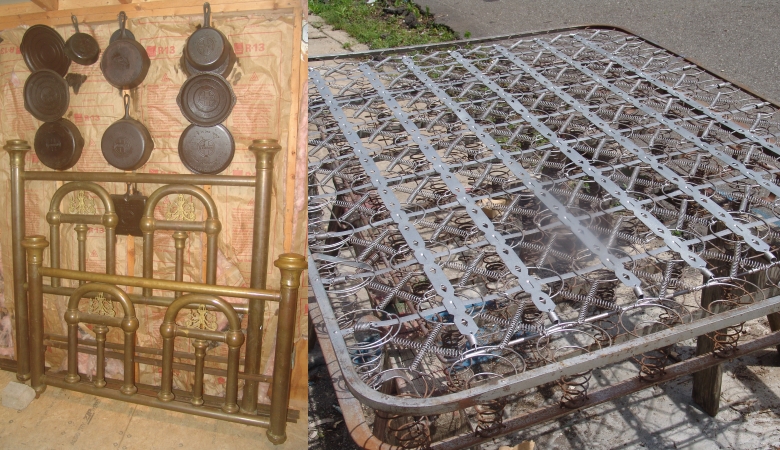 |
|
|
|
Post by mach12 on May 7, 2019 21:56:59 GMT -5
I'm just putting the finishing touches on my kitchen remodel and looking at your project is giving me itchy fingers. Or an itchy hammer hand or whatever. There's a pretty good chance that taking on another project right now would be the nail in the coffin of my marriage though lol.
That planning that you're doing is certainly the way to go, especially in a small space. It's surprising how little space works when it's arranged well. The guy I bought one of my Chambers stoves from actually set up a propane camp stove, one of those Coleman camp sinks, and plywood scraps on boxes for counters just to be sure he'd like the layout. He was a general contractor and said one of the people he did a remodel for did that and he thought it was a great idea.
Love that brass bed too. Probably gonna have the Bob Dylan tune going through my head all night though.
|
|
|
|
Post by ronruble on May 16, 2019 9:31:43 GMT -5
FYI - Chambers Stove Green
Sherwin-Williams makes a paint color called 'Retro Mint' (SW 9036) which is a match to the green color of Pre-A Chambers stoves (Miss Jade) and possibly later green Chambers stoves. I am planning to paint the trim in the kitchen the same color as the stove and this will be what I will use. Found it by accident when I purchased a sample of this mint color for the living room. This Retro Mint color trim should look good with the Mustard Yellow colored walls in the kitchen.
|
|
|
|
Post by ronruble on Jun 1, 2019 18:37:48 GMT -5
June 1, 2019 Lucky day – One block away from the building I am restoring a man is cleaning out an old building and having a sidewalk sale. I purchased another above sink metal kitchen cabinet which I will try to rework (shorten) to fit over my 42 inch sink. If it does not work I can go back to the single cabinet which is shown in my mock-up photo. Also, the great find today was a corner metal kitchen cabinet that I will put over the refrigerator. I wanted one for the kitchen but I have not seen any for sale on eBay, Craigslist or other places. The good part is that I paid a total of $6 for both cabinets  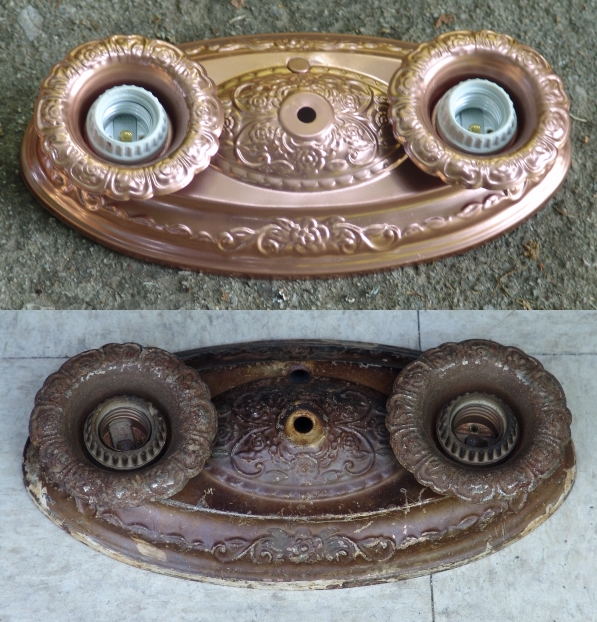 Photo- After and before Restored the light fixture for the kitchen. I found a great new spray-on stripper at Wall-Mart called Kwik-Strip; strong stuff, rubber gloves and use outdoors. Spry on and let it set for 30 minutes; wipes off paint with rag. My errors – tried Rust-Oleum hammered copper but I did not like to look. Also tried bright copper then after it dried (per instructions on can) lightly coat with with metallic “oil-rubbed bronze”. The idea was to lightly polish off a little of the bronze cover paint allowing some of the bright copper color show through. This turned into a mess; the two paints came off at the same time. I do not know what caused it; not enough time to dry each coat of paint, possible stripper residue, surface has nickle or chrome surface that the paint did not stick or cure correctly. After stripping it for the forth time, I lightly wire brushed the surface with soft power wire brush, then clean / degreaser with “Krud Kutter”' sprayed with Rust-Oleum Primmer (self etching type) and then 4 light coats of Rust-Oleum “Bright Coat Copper” which is the same color that the tin ceiling panels with be painted. I replaced the light sockets with vintage style porcelain light sockets with modern screw terminals I found at Lowes for a little over $4 each - easy rewiring restoration. PS - Cross your fingers - I signed contract to sell my cabin of the lake. If everything goes correctly, I will close at the end of June and the 'real' restoration will start on my new building. I will have a little over 60 days to get the new place livable and move out of the cabin. |
|
|
|
Post by nana on Jun 2, 2019 13:00:43 GMT -5
Fingers duly crossed, good luck!
|
|
|
|
Post by mach12 on Jun 2, 2019 23:04:29 GMT -5
I love how that fixture came out!
|
|
|
|
Post by karitx on Jun 5, 2019 17:14:10 GMT -5
Fingers crossed! I hope it's a smooth process!
|
|
|
|
Post by chipperhiker on Jun 8, 2019 23:56:30 GMT -5
Good Luck, Ron!
|
|
|
|
Post by ronruble on Jun 9, 2019 11:50:40 GMT -5
Sadly, they will not be buying the cabin. Long story I'll post later
|
|
|
|
Post by pooka on Jun 10, 2019 3:49:52 GMT -5
Well RATS!
All you can do is keep looking up & pushing forward. All you can do is the best you can. Take it one day at a time. As long as you're putting in some effort, things will happen. Maybe not as quick as you like, but some things happen on their own timetable. Just never give up. Often our live follow their own stars. We're just along for the ride.
Too many people are sleep walking through life, with no with little focus pulling them along. You have a kind of picture in your minds eye of where you want to go. So you're ahead of the game than most. Just keep pushing forward. As they say, a rolling stone gather no moss. One day it'll be time to lay that burden down, but not yet. As Robert Frost says;
The woods are lovely, dark and deep,
But I have promises to keep,
And miles to go before I sleep,
And miles to go before I sleep.
|
|
|
|
Post by chamberinmycottage on Aug 3, 2019 2:10:45 GMT -5
Hi. I'm new here to the group and I was intrigued by your post and seeing the work you are getting done. I think the one thing that I missed and really want to know is, what kind of museum are you going to have? And btw, I'm in TN and hope to know more and maybe drop in and see things for myself. 😁
|
|
|
|
Post by ronruble on Aug 19, 2019 15:36:08 GMT -5
It will be more than a year before I start restoring the section of the building where I want to have the museum. Best description of the 'Ruble's Wonderings' Museum is: “It will make the Addams Family look normal”. It will be artifacts, fossils and unusual items that have odd/interesting history. Picture is from when I set up a display a few months ago at the Carson Newman University annual College Street Festival in Jefferson City TN 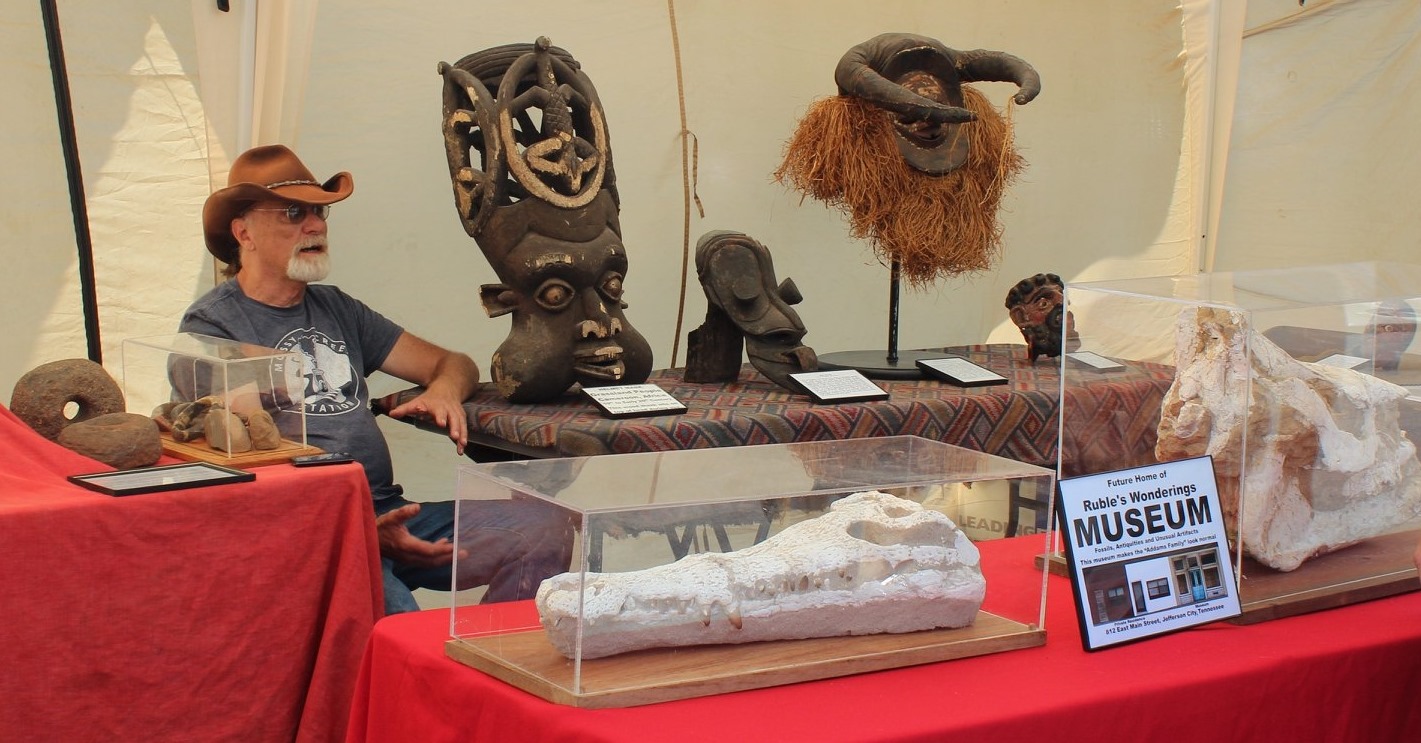 |
|